2017-06-01

T-SQL Recipie: Generate XML/JSON Output

Change of Circumstances

Life is about change, I had never thought one day I would work in a Java/HP Vertica powered cloud BI environment. But it is the fact. How amazing it is...

So I am going to add a few things different to MS techs in the future, some techs related to my current job. So if you see something different to my previous post, don't worry, it is still me :P

Now back to the topic, one of my previous colleagues dropped a question to me today. Basically the core of the question is how to reflect parent/child relationship when exporting query result into XML/JSON. It is quite a common scenario today, so have a quick look at below code:

use tempdb
go

declare @cust table (custid int identity(1,1), custname varchar(50))
declare @sale table (saleid int identity(1, 1), custid int, amount money)

insert into @cust(custname) values ('CQI'), ('ABC'), ('JSMITH')
insert into @sale(custid, amount) values (1, 100), (1, 20), (2, 55), (2, 80), (2, 16), (3, 10)

select * from @cust c join @sale s on c.custid = s.custid


--for xml
--valid since sql2008
--use corelate query to feed child records
--TYPE is a must to ensure return type is xml
select c.custid as '@custid',
 c.custname as '@custname',
 (select saleid as '@saleid', amount as '@amount' from @sale where custid = c.custid for xml path('sales'), TYPE)
from @cust c
for xml path('cust'), root('customersales')

--for json
--2016 only
select c.custid as '@custid',
 c.custname as '@custname',
 (select saleid as '@saleid', amount as '@amount' from @sale where custid = c.custid for json path) as Sales
from @cust c
for json path

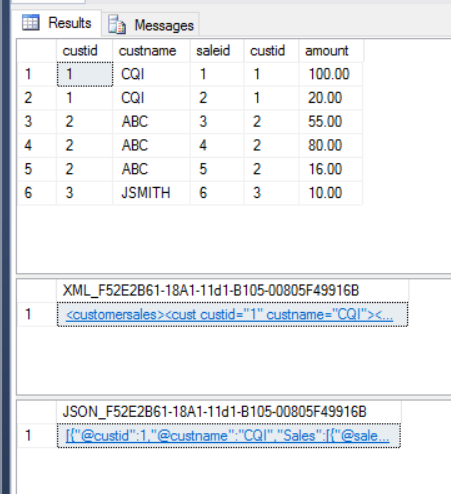
So if we run the code listed above:

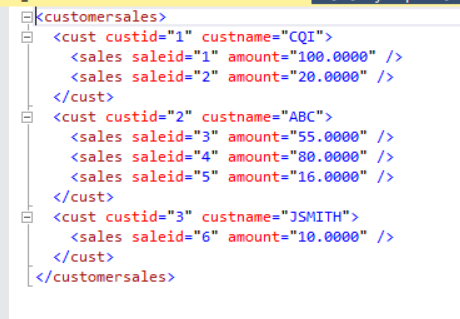
And if we expand the XML result


And here is the JSON result


Hope it can give you some ideas if you have a need to transfer the result set into XML/JSON format. But please keep in mind:
  • For JSON clause is for SQL Server 2016 only
  • In XML output the TYPE keyword in co-related query is required, to ensure output is XML type.
So that is it. Enjoy.

2017-05-06

Create SSIS Package in Code Part 3 - BIML

This is the 3rd, and the last post of the topic "Create SSIS package in Code". The other two posts about this topic can be found via the links below:

So today's topic is creating SSIS package via BIML. BIML, stands for Business Intelligence Markup Language,  is an extremely powerful tool can help you prepare and standardize your ETL project. Just in case you haven't heard of it, you can find everything about BIML at BIMLScript site. Just like previous two posts, I am going to demonstrate how easily we can create identical package (a Data Flow Task, flat file connection, and OLE DB connection) in BIML today.

Creating BIML for SSIS package is a bit different to our previous projects, in which we did C# code in a C# console program. To create a BIML file, we do our task in Visual Studio Business Intelligence project.

So first of first, we need to have BIMLExpress installed in our development environment. Then in your Visual Studio IDE you should be able to add BIML file into your project via the menu item:


Alternatively, you can add a BIML file into the project through the context menu.


After we have BIML file added into the project, we can start to write BIML components. To save your time, here is what I wrote:

<biml xmlns="http://schemas.varigence.com/biml.xsd">
    
    <connections>
        <flatfileconnection fileformat="myBIMLFlatFileFormat" filepath="D:\test\test.txt" name="myBIMLFltCon"></flatfileconnection>
        <oledbconnection connectionstring="Data Source=CHI\SS2016;Initial Catalog=Staging;Provider=SQLNCLI11.1;Integrated Security=SSPI" name="myBIMLOleCon"></oledbconnection> 
    </connections>
        
    <fileformats>
        <flatfileformat codepage="1252" columnnamesinfirstdatarow="true" flatfiletype="Delimited" headerrowdelimiter="|" isunicode="false" name="myBIMLFlatFileFormat" textqualifer="None">
            <columns>
                <column columntype="Delimited" datatype="AnsiString" delimiter="|" length="255" name="FirstName"></column>
                <column columntype="Delimited" datatype="AnsiString" delimiter="|" length="255" name="LastName"></column>
                <column columntype="Delimited" datatype="AnsiString" delimiter="|" length="100" name="Suburb"></column>
                <column columntype="Delimited" datatype="AnsiString" delimiter="|" length="3" name="State"></column>
                <column columntype="Delimited" datatype="AnsiString" delimiter="CRLF" length="4" name="Postcode"></column>
            </columns>
            
        </flatfileformat>
    </fileformats>
        
    <databases>
        <database connectionname="myBIMLOleCon" name="BIMLStaging"></database>
    </databases>
    
    <schemas>
        <schema databasename="BIMLStaging" name="BIMLSchema"></schema>
    </schemas>
    
    <tables>
        <columns>
                <column datatype="AnsiString" length="255" name="FirstName"></column>
                <column datatype="AnsiString" length="255" name="LastName"></column>
                <column datatype="AnsiString" length="100" name="Suburb"></column>
                <column datatype="AnsiString" length="3" name="State"></column>
                <column datatype="AnsiString" length="4" name="Postcode"></column>
            </columns><table name="customer" schemaname="BIMLStaging.BIMLSchema">
            
        </table>
</tables>
        
    
    <packages>
        <package name="myBIMLPackage" protectionlevel="EncryptSensitiveWithUserKey">
            <tasks>
                <dataflow name="myBIMLDFT">
                    <transformations>
                        <flatfilesource connectionname="myBIMLFltCon" name="myBIMLFltSrc"></flatfilesource>
                        <oledbdestination connectionname="myBIMLOleCon" name="myBIMLOLEDest">
                            <inputpath outputpathname="myBIMLFltSrc.Output"></inputpath>
                            <externaltableoutput table="customer"></externaltableoutput>
                        </oledbdestination>     
                    </transformations>
                </dataflow>
            </tasks>
        </package>
    </packages>
    
</biml>


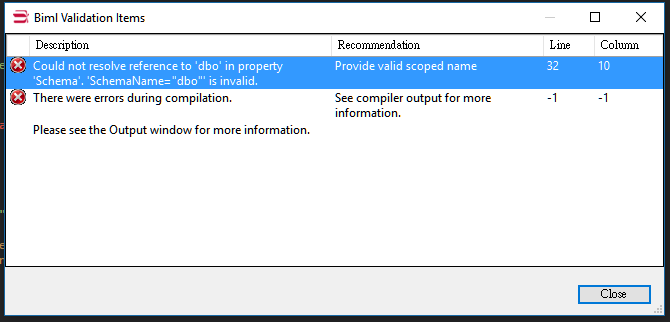
Once we complete the coding task, we can simply right click the BIML file, and then press "Generate SSIS Package".


Now a new package is generated in our Business Intelligence project (myBIMLPackage). Open the package and run the package, we got the execution result right away.


Obviously, BIML is much simpler than other approaches. It hides the complicated mapping routines for you when you are designing your package. Within the Business Intelligence project, you can add BIML script file as a standard template and then generate packages in one batch. Additionally, BIML express provides quite a lot handy functions to improve your productivity, such as BIML script validation. So I strongly recommend this approach when you are working in ETL project.


Here is the end of the series "Create SSIS package in Code". Before my next post, enjoy it. :)

2017-04-24

Create SSIS Package in Code Part 2 - EzAPI

This is the 2nd post of the topic "Create SSIS package in Code". The full list of the posts about this topic can be found via the links below:
Today let's look at the option of EzAPI. Basically EzAPI is a set of classes designed to simplify and automate the process of creating SSIS packages. You can find its details and documentations at CodePlex, or just in case at the time you read this post CodePlex has been shut down, you can find it on the nuget.

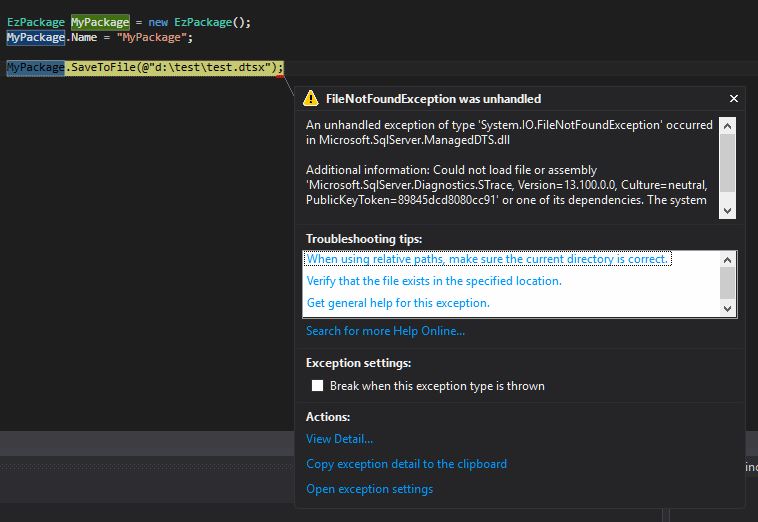
Before I show you the steps of creating a package via EzAPI, you may or may not face this error when you try to save the package:  

An unhandled exception of type 'System.IO.FileNotFoundException' occurred in Microsoft.SqlServer.ManagedDTS.dll

Additional information: Could not load file or assembly 'Microsoft.SqlServer.Diagnostics.STrace, Version=13.100.0.0, Culture=neutral, PublicKeyToken=(your machine based value)' or one of its dependencies. The system cannot find the file specified.


To my understanding it is a reference error, that when the API tries to call its dependency, it cannot find the correct path. To fix the problem, we can manually add the reference. In my case, I move to the system folder "C:\Windows\assembly", search and find correct STrace.dll location (version 13.100.0.0), and then add it into the project reference.


Now if we call the SaveToFile method again, the error has gone.


OK, it is time for the EzAPI. Generally, creating package via EzAPI is much simpler than the pure C# way. Because many SSIS objects have been wrapped and simplified in EzAPI. Below code did the identical thing to my first example: import some records from a flat file into database table, but in a relatively simple way.


        static void Main(string[] args)
        {

            string fltFilePath = @"d:\test\test.txt";
            string pkgPath = @"d:\test\myEzAPIPackage.dtsx";

            EzPackage MyPackage = new EzPackage();
            MyPackage.Name = "myEzAPIPackage";

            //flat file connection manager
            EzFlatFileCM fltFileCM = new EzFlatFileCM(MyPackage);
            fltFileCM.ConnectionString = fltFilePath;
            fltFileCM.ColumnNamesInFirstDataRow = true;

            //similar to the pure C# example
            //we hard code column metadata
            #region columns
            IDTSConnectionManagerFlatFileColumn100 colFirstName = fltFileCM.Columns.Add();
            colFirstName.ColumnType = "Delimited";
            colFirstName.ColumnDelimiter = "|";
            colFirstName.DataType = DataType.DT_STR;
            colFirstName.ColumnWidth = 255;
            ((IDTSName100)colFirstName).Name = "FirstName";


            IDTSConnectionManagerFlatFileColumn100 colLastName = fltFileCM.Columns.Add();
            colLastName.ColumnType = "Delimited";
            colLastName.ColumnDelimiter = "|";
            colLastName.DataType = DataType.DT_STR;
            colLastName.ColumnWidth = 255;
            ((IDTSName100)colLastName).Name = "LastName";

            IDTSConnectionManagerFlatFileColumn100 colSuburb = fltFileCM.Columns.Add();
            colSuburb.ColumnType = "Delimited";
            colSuburb.ColumnDelimiter = "|";
            colSuburb.DataType = DataType.DT_STR;
            colSuburb.ColumnWidth = 100;
            ((IDTSName100)colSuburb).Name = "Suburb";

            IDTSConnectionManagerFlatFileColumn100 colState = fltFileCM.Columns.Add();
            colState.ColumnType = "Delimited";
            colState.ColumnDelimiter = "|";
            colState.DataType = DataType.DT_STR;
            colState.ColumnWidth = 3;
            ((IDTSName100)colState).Name = "State";


            IDTSConnectionManagerFlatFileColumn100 colPostcode = fltFileCM.Columns.Add();
            colPostcode.ColumnType = "Delimited";
            colPostcode.ColumnDelimiter = Environment.NewLine; //this is the last column, so the delimiter needs to be set as new line
            colPostcode.DataType = DataType.DT_STR;
            colPostcode.ColumnWidth = 4;
            ((IDTSName100)colPostcode).Name = "Postcode";

            #endregion

            //ole db connection manager
            EzOleDbConnectionManager oleDBCM = new EzOleDbConnectionManager(MyPackage);
            oleDBCM.ConnectionString = "Data Source = CHI\\SS2016;Provider=SQLNCLI11.1;Initial Catalog = Staging;Integrated Security = SSPI;";
            oleDBCM.Name = "my OLE Connection Manager";

            //data flow task
            EzDataFlow dft = new EzDataFlow(MyPackage);
            dft.Name = "dft EzAPI";

            EzFlatFileSource fltSrc = new EzFlatFileSource(dft);
            fltSrc.Connection = fltFileCM;
            fltSrc.ReinitializeMetaData();

            EzOleDbDestination oleDest = new EzOleDbDestination(dft);
            oleDest.Connection = oleDBCM;
            oleDest.AttachTo(fltSrc);
            oleDest.Table = "Customer";
            

            MyPackage.SaveToFile(pkgPath);

            Console.WriteLine("created successfully");
            Console.ReadLine();

        }


From this code list, we can see EzAPI simplifies the pipeline management, so that we do not need to spend time on adapter coding. However, for the connection managers we still need to define their metadata, and especially when we need to assign flat file source into the data flow task, we need to refresh the metadata by calling ReinitializeMetadata() method.

Now run the program by press F5, the myEzAPIPackage should be generated in your D:\test folder. Open the package in design mode and run it:


So this is the end of this post. In my next post, I will introduce the 3rd way to create the SSIS package dynamically. Before that, enjoy the code.