Well, not sure about your opinion, but I think map visual in Power BI is not that...good. One alternative way is to use SVGs but it is hard to find state/country SVG materials for AU, so I just spent some time to convert states and country map to SVGs: LINK
2024-04-26
SVG for AU

2023-01-19
AWS Redshift Data Import in Python
Had done nothing for this blog for a long long long time, primarily because I changed my job from a technical role to a hybrid role.
Now just be quick, let's assume you have some large datasets need to be loaded into AWS Redshift. Obviously the best practice from AWS is load the file to S3 bucket, then COPY the file from S3 to Redshift.
Looks so simple huh? Now what if you are just an analytics guy, would your IT department provision a S3 bucket to you? would you be given COPY permission? Would you request be lodged as a Jira ticket and need to wait for a full sprint?
So let's try another way, basically maximum batch file size in AWS Redshift is about 16MB, so the workaround here is we can generate a batch insert statement, e.g. INSERT INTO TABLE(col1, col2...) VALUES (val1, val2...) , ... But to control the size we need a pagination function. When we have a pagination function, we want to have a configuration file for flexibility. And somehow a log function would be great if any issue happens. So below is the list of requirements:
- source flat file
- destination Redshift table name
- configuration file to list source file delimiter, quotation, and source columns to destination column mapping
- page size
for the configuration file, below is an example:
{
"delimiter":",",
"quotation":"\"",
"columns":[
{
"flat col1":"table col1",
"flat col2":"table col2"
}
]
}
And the python script is here:
#%%
from sqlalchemy import create_engine
import csv
import json
import logging
import uuid
from datetime import datetime
from urllib.parse import quote

username = "" #<= your redshift username
password = "" #<= your redshift password
rsServer = "" #<= your redshift instance address

engineRedshift = create_engine("postgresql://{}:{}@{}".format(quote(username), quote(password)), rsServer)

destSchema = "" #<= destination redshift schema
destTable = "" #<= destination redshift table
srcFile = "" #<= source file
configFile = "" #<= configuration json file
pageSize = 10000 #<= page size

if (username == "") or (password == ""):
    raise Exception("Must provide username/password")
#%%
# provide a guid for each execution in the log file
uid = uuid.uuid4()

logFileName = "\\".join(srcFile.split("\\")[:-1]) + "\\" + "import_{}_{}.log".format(
    "".join(srcFile.split("\\")[-1:][0].split(".")[0:1]),
    datetime.now().strftime("%Y%m%d"))

logging.basicConfig(
    filename=logFileName,
    format="{} - %(asctime)s - %(message)s".format(uid),
    level=logging.INFO
    )

#%%
logging.info("source file: {}".format(srcFile))
logging.info("destination table: {}.{}".format(destSchema, destTable))
logging.info("configuration file: {}".format(configFile))
logging.info("pagination setting: {}".format(pageSize))

#%%
# step 1: parse configuration to get delimiter, quotation, source columns and dest columns
with open(configFile, "r") as f:
    s = json.load(f)

delimiter = s["delimiter"]
quotation = s["quotation"]

lstSrc = []
lstDest = []

for key in s["columns"][0]:
    lstSrc.append(key)
    lstDest.append(s["columns"][0][key])

lstSrc = [c.lower() for c in lstSrc]
lstdesc = [c.lower() for c in lstDest]

#%%
logging.info("configuration delimiter: {}".format(delimiter))
logging.info("configuration quotation: {}".format("NA" if quotation == "" else quotation))
logging.info("configuration source columns: {}".format(lstSrc))
logging.info("configuration destination columns: {}".format(lstDest))

#%%
# step 2: all source columns should be in source csv file, read file header
# for extra columns in the source file, put column position in lstPop to drop
with open(srcFile, newline="") as flatFile:
    if quotation != "":
        reader = csv.reader(flatFile, delimiter=delimiter, quotechar=quotation)
    else:
        reader = csv.reader(flatFile, delimiter=delimiter)
    header = next(reader)

header = [c.lower() for c in header]

lstPop =[]
for c in [c for c in header if c not in lstSrc]:
    lstPop.append(header.index(c))

# lstPop

logging.info("Columns to Drop from Source: {}".format(lstPop))

#%%
# step 3: read dest table schema
# if dest column in configuration file is not in redshift, raise error directly
# just like MSSQL import wizard, if validation raises error, simple stop the process
# note all destination columns need to be NULLABLE = YES, as we turn empty string in csv to NULL
sql = """select lower(column_name) as column_name, lower(is_nullable) as is_nullable
from information_schema.columns
where table_schema ilike '{}'
    and table_name ilike '{}'
order by ordinal_position""".format(destSchema, destTable)

lstR = [r for r in engineRedshift.execute(sql)]

lstCols = [r[0] for r in lstR]
for c in lstDest:
    if c not in lstCols:
        raise Exception("{} not in dest table".format(c))

lstNullable = [r[0] for r in lstR if r[1] == "no"]
if len(lstNullable) > 0:
    raise Exception("column(s) {} needs to be NULLable".format(",".join(lstNullable)))

logging.info("Verify destination columns: Passed")
#%%
# function to construct value list for insert statement
# fObj => file object
# lst => columns to drop
# min => start row
# max => end row
# d => delimiter
# q => quotation
def construct_string_sql_by_fObj(fObj, lst, min, max, d, q):
    value_list = ""

    try:
        if q != "":
            reader = csv.reader(fObj, delimiter=d, quotechar=q)
        else:
            reader = csv.reader(fObj, delimiter=d)
        page = [row for idx, row in enumerate(reader) if (idx >= min) & (idx < max) ]

        for row in page:
            if len(lst) > 0:
                for i in sorted(lst, reverse=True):
                    del row[i]

            row = [r.replace("'", "''") for r in row]
            s = "('" + "','".join(row) + "'),"
            value_list +=s
    except:
        return ""

    return value_list[:-1].replace("'',", "NULL,")


#%%
theFile = open(srcFile, "r").readlines()
conn = engineRedshift.connect()

for i in range(0, int(len(theFile)/pageSize) + 1):
    min = i * pageSize + 1
    max = (i * pageSize + pageSize if i * pageSize + pageSize < len(theFile) else len(theFile)) + 1

    vlst = construct_string_sql_by_fObj(theFile, lstPop, min, max, delimiter, quotation)

    # note: file row count != count of rows to insert because newline could found
    # the pagination is calculated by file row count so if empty page found all remaining pages can be skipped
    if vlst == "":
        break

    stmt = "insert into {}.{}({}) Values".format(destSchema, destTable, ",".join(lstDest))
    stmt += vlst

    print("from {} to {}".format(min, max - 1))
    # print(stmt)


    conn.execute(stmt)

    logging.info("Data import start: from {} to {}".format(min, max - 1))

conn.close()
print("import completed")

logging.info("File import completed\n\n\n\n")

# %%
Enjoy!
2019-12-19
Retrieve SharePoint Online List by Graph API
Last day in 2019, and last post in 2019.
Actually pulling SharePoint List from Power Query/Power BI is much faster and straightforward. But in some cases, you may still need to follow the traditional ETL way. Hope below script can help you if you need it.
Firstly we need to register the app in Azure AD (Check Here). After create your app, write down 3 ids: tenant id, client id, and the secret. Note the secret will only be exposed to you when you create the app, then it will be masked (though you can always create a new one.)
To allow your app to access the SharePoint list, you need to enable the "Site.Read.All" permission under the Application Permission category, as demonstrated below. Keep in mind though, the "Site.Read.All" permission needs AAD admin's consent.

That is all about the app setup. To query the list, we need to exchange the token by our tenant id, client id, and the secret:
Then we follow the routine "search site => search list => get list item":
Actually pulling SharePoint List from Power Query/Power BI is much faster and straightforward. But in some cases, you may still need to follow the traditional ETL way. Hope below script can help you if you need it.
Firstly we need to register the app in Azure AD (Check Here). After create your app, write down 3 ids: tenant id, client id, and the secret. Note the secret will only be exposed to you when you create the app, then it will be masked (though you can always create a new one.)
To allow your app to access the SharePoint list, you need to enable the "Site.Read.All" permission under the Application Permission category, as demonstrated below. Keep in mind though, the "Site.Read.All" permission needs AAD admin's consent.

That is all about the app setup. To query the list, we need to exchange the token by our tenant id, client id, and the secret:
 public class RespToken
        {
            public string token_type { get; set; }
            public int expires_in { get; set; }
            public int ext_expires_in { get; set; }
            public string access_token { get; set; }
        }

        public static string GetAccessToken(string tenentId, string clientId, string clientSecret)
        {
            string token = string.Empty;

            string uriToken = string.Format("https://login.microsoftonline.com/{0}/oauth2/v2.0/token", tenentId);
            string contentType = "application/x-www-form-urlencoded";
            string grantType = "client_credentials";
            string scope = "https://graph.microsoft.com/.default";

            string tmpBody = "grant_type={0}&client_id={1}&client_secret={2}&scope={3}";
            string body = string.Format(tmpBody, grantType, clientId, clientSecret, scope);
            byte[] contents = Encoding.UTF8.GetBytes(body);

            HttpWebRequest request = (HttpWebRequest)WebRequest.Create(uriToken);
            request.ContentType = contentType;
            request.Method = "POST";

            request.ContentLength = contents.Length;
            using (Stream writeStream = request.GetRequestStream())
            {
                writeStream.Write(contents, 0, contents.Length);
            }

            using (HttpWebResponse response = (HttpWebResponse)request.GetResponse())
            {
                using (Stream readStream = response.GetResponseStream())
                {
                    string responseBody = string.Empty;
                    using (StreamReader sr = new StreamReader(readStream))
                    {
                        responseBody = sr.ReadToEnd();
                    }
                    JavaScriptSerializer Serializer = new JavaScriptSerializer();
                    var r = Serializer.Deserialize(responseBody);
                    token = r.access_token;
                }
            }

            return token;
        }
Then we follow the routine "search site => search list => get list item":
static void Main(string[] args)
        {

            string tenentId = string.Empty;
            string clientId = string.Empty;
            string clientSecret = string.Empty;
            string siteName = string.Empty;

            string siteId = string.Empty;
            string listId = string.Empty;


            Console.WriteLine("Tenent Id: ");
            tenentId = Console.ReadLine();

            Console.WriteLine("Client Id: ");
            clientId = Console.ReadLine();

            Console.WriteLine("Client Secret: ");
            clientSecret = Console.ReadLine();

            if (string.IsNullOrEmpty(tenentId) || string.IsNullOrEmpty(clientId) || string.IsNullOrEmpty(clientSecret))
            {
                Console.WriteLine("empty value found in mandatory parameters");
                return;
            }

            string token = GetAccessToken(tenentId, clientId, clientSecret);
            Console.WriteLine("Token acquired, query site");


            Console.WriteLine("Input site name for search: ");
            siteName = Console.ReadLine();

            string uriSite = $"https://graph.microsoft.com/v1.0/sites?search={siteName}";

            HttpWebRequest request = (HttpWebRequest)WebRequest.Create(uriSite);
            request.Method = "GET";
            request.Headers.Add(HttpRequestHeader.Authorization, token);

            using (HttpWebResponse response = (HttpWebResponse)request.GetResponse())
            {
                using (Stream s = response.GetResponseStream())
                {
                    using (StreamReader r = new StreamReader(s))
                    {
                        string contents = r.ReadToEnd();
                        var j = JObject.Parse(contents);
                        siteId = j["value"]
                            .FirstOrDefault(x => x["name"].ToString().ToLower() == "msgraph")["id"]
                            .ToString();

                    }
                }
            }

            if (string.IsNullOrEmpty(siteId))
            {
                Console.WriteLine("error happens, cannot obtain site id");
                return;
            }


            Console.WriteLine($"site id acquired, {siteId}");
            string uriList = $"https://graph.microsoft.com/v1.0/sites/{siteId}/lists";
            request = (HttpWebRequest)WebRequest.Create(uriList);
            request.Method = "GET";
            request.Headers.Add(HttpRequestHeader.Authorization, token);

            using (HttpWebResponse response = (HttpWebResponse)request.GetResponse())
            {
                using (Stream s = response.GetResponseStream())
                {
                    using (StreamReader sr = new StreamReader(s))
                    {
                        string content = sr.ReadToEnd();
                        var jObject = JObject.Parse(content);

                        listId = jObject["value"]
                            .FirstOrDefault(x => x["name"].ToString().ToLower() == "events")["id"]
                            .ToString();
                    }
                }
            }

            if (string.IsNullOrEmpty(listId))
            {
                Console.WriteLine("error occurred, cannot obtains list id");
                return;
            }

            Console.WriteLine($"list id: {listId}");

            Console.ReadLine();

        }
2019-12-16
Power Query for Twitter API
I am lazy, so let's make it quick. Looping twitter could be a bit trouble so I put power query script (for searching a specific account by timeline API) below. Hope it helps
1. A function to get token
2. Another function to get the max twitter id regarding the topic
3. the 3rd function to get result by token and endpoint. (technically you don't need it, just to make the main function easy to read)
4. finally the main query (note suggest to have a initial Id to limit the size of the result)
1. A function to get token
let
    fnGetToken = () =>
        let
            key = "Basic " & Binary.ToText(Text.ToBinary("{you should know what it is}"),0),
            url = "https://api.twitter.com/oauth2/token",
            getJson = Web.Contents(url,
                [
                    Headers = [#"Authorization"=key,#"Content-Type"="application/x-www-form-urlencoded;charset=UTF-8"],
                    Content = Text.ToBinary("grant_type=client_credentials")
                ]
            ),
            j = Json.Document(getJson),
            token = j[access_token],
            tokenHeader = "bearer " & token
        in tokenHeader
in
    fnGetToken
2. Another function to get the max twitter id regarding the topic
let
 fnGetMaxId = (token) =>
 let
  GetJsonQuery = Web.Contents("https://api.twitter.com/1.1/statuses/user_timeline.json?screen_name={this is the account}&count=1",
   [
    Headers = [#"Authorization"=token]
   ]
  ),
  FormatAsJsonQuery = Json.Document(GetJsonQuery),
  t = Table.FromList(FormatAsJsonQuery, Splitter.SplitByNothing(), null, null, ExtraValues.Error),
  maxId = Table.ExpandRecordColumn(t, "Column1", {"id_str"}, {"maxid"})
 in
  maxId
in
 fnGetMaxId
3. the 3rd function to get result by token and endpoint. (technically you don't need it, just to make the main function easy to read)
let
 fnGetList = (token, endpoint) =>
  let
   req = Web.Contents(endpoint,
    [
     Headers = [#"Authorization"=token]
    ]
   ),
   json = Json.Document(req)
  in
   json
in
 fnGetList
4. finally the main query (note suggest to have a initial Id to limit the size of the result)
let
 fn = (initId) =>
  let
   token = fnGetTokenHeader(),
   I = if initId = "" then fnGetMaxId(token){0}[maxid] else initId,
   endPoint = "https://api.twitter.com/1.1/statuses/user_timeline.json?screen_name={this is the account}&max_id=" & I & "&count=200",
   records = fnGetResults(token, endPoint),
   tbl = Table.FromList(records, Splitter.SplitByNothing(), null, null, ExtraValues.Error),
   tblMaxIds = Table.ExpandRecordColumn(tbl, "Column1", {"id_str"}, {"maxid"}),
   minId = try List.Min(tblMaxIds[maxid]) otherwise null,
   recordSet = [records = records, nextId = minId]
  in
   recordSet,
 resultSet = List.Generate(
                    () => fn(""),
                    each Number.FromText(_[nextId]) >= 1000000000000000000, //an max id you want to put to limit result size, you should get a value by calling getMaxId function, otherwise it could return too many lists
     // each _[nextId] <> null,
                    each fn(_[nextId]),
                    each [nextId = _[nextId], records = _[records]]
                    )
in
    resultSet
2019-03-19
Handling Long File Name in Windows
Let's make the question short: on Windows platform, how can you copy the file if the path is too long?
This question is coming from a project I worked on recently. What happened is that quite a few Access Databases are dumped to a network shared folder, and we need to move them to a staging folder for data process. Because the access database is dumped automatically by a 3rd party software, some access databases were saved in an invalid file path (more than 260 characters in file's full name).
The solution is simple: RoboCopy. It is a standard component in Windows now and you can find an explanation of it here. So basically what we need to do, is listing all files from the source folder by time stamp, and then calling the RoboCopy to copy the file. Procedure is simple but just a few things need to have a look:
1. The FileInfo class acts differently by Windows platform
The SSIS package was built on Windows 7 platform (yes, 2019 already I know, but you won't believe how old client's infrastructure is.). On Windows 7 when calling FileInfo's full file name, there will be an IO.PathTooLongException. As demonstrated below, in the try catch block we extract file's name and path if the file's full name is too long, and then construct file's full name and pass it to RoboCopy.

So far so good, but the SSIS package eventually would be triggered on Windows 2012 platform. When we tested the package, the FileInfo's FullName actually returned the full path of the file, and the exception occurred at the directory level, which left us an unhandled exception: So files supposed to raise IO.PathTooLongException were passed to SSIS's File System Task, and obviously, SSIS's File System Task cannot handle File Name Too Long error.


Fixing the error is easy, but it is a good lesson: keeping dev and prod environment identical is critical.
2. RoboCopy can have more than one return code to represent success result.
When calling SSIS's Execute Process Task, only one return code is accepted by default, e.g. 0 by default is treated as success value, return code other than 0 will be treated as failure.
But when you look at RoboCopy's document, you can see RoboCopy's return code is a bitmap. In my situation, we need to set more than one return codes for success value.
We can easily fix this problem by following steps below:
In the Execute Process Task Configuration windows, change FailTaskIfReturnCodeIsNotSuccessValue to False. By setting it to false, Execute Process Task will always report success.

Now keep Execute Process Task selected and go to the Properties window (locate at the bottom-right corner by default, press Ctrl + W then P if you cannot find it), assign a package variable to ExecValueVariable. It will capture the execute result to the variable.

Now you can figure it out, instead of letting Execute Process Task report success or failure, we capture execution result to a variable, then in the Precedent Constraint we can use expression to identify the actual outcome of the RoboCopy.
That is today's post, good experience to find and fix these issues though at the beginning the task was looked so simple.
This question is coming from a project I worked on recently. What happened is that quite a few Access Databases are dumped to a network shared folder, and we need to move them to a staging folder for data process. Because the access database is dumped automatically by a 3rd party software, some access databases were saved in an invalid file path (more than 260 characters in file's full name).
The solution is simple: RoboCopy. It is a standard component in Windows now and you can find an explanation of it here. So basically what we need to do, is listing all files from the source folder by time stamp, and then calling the RoboCopy to copy the file. Procedure is simple but just a few things need to have a look:
1. The FileInfo class acts differently by Windows platform
The SSIS package was built on Windows 7 platform (yes, 2019 already I know, but you won't believe how old client's infrastructure is.). On Windows 7 when calling FileInfo's full file name, there will be an IO.PathTooLongException. As demonstrated below, in the try catch block we extract file's name and path if the file's full name is too long, and then construct file's full name and pass it to RoboCopy.

So far so good, but the SSIS package eventually would be triggered on Windows 2012 platform. When we tested the package, the FileInfo's FullName actually returned the full path of the file, and the exception occurred at the directory level, which left us an unhandled exception: So files supposed to raise IO.PathTooLongException were passed to SSIS's File System Task, and obviously, SSIS's File System Task cannot handle File Name Too Long error.


Fixing the error is easy, but it is a good lesson: keeping dev and prod environment identical is critical.
2. RoboCopy can have more than one return code to represent success result.
When calling SSIS's Execute Process Task, only one return code is accepted by default, e.g. 0 by default is treated as success value, return code other than 0 will be treated as failure.
But when you look at RoboCopy's document, you can see RoboCopy's return code is a bitmap. In my situation, we need to set more than one return codes for success value.
We can easily fix this problem by following steps below:
In the Execute Process Task Configuration windows, change FailTaskIfReturnCodeIsNotSuccessValue to False. By setting it to false, Execute Process Task will always report success.

Now keep Execute Process Task selected and go to the Properties window (locate at the bottom-right corner by default, press Ctrl + W then P if you cannot find it), assign a package variable to ExecValueVariable. It will capture the execute result to the variable.

Now you can figure it out, instead of letting Execute Process Task report success or failure, we capture execution result to a variable, then in the Precedent Constraint we can use expression to identify the actual outcome of the RoboCopy.
That is today's post, good experience to find and fix these issues though at the beginning the task was looked so simple.
2019-01-22
SSAS Tabular Case Study: Change Cases of Member
Happy New Year, and I hope everyone all the best to 2019.
To begin with 2019, I just want to keep it simple. Let's see a small problem I found in SSAS tabular model recently: It could be very confusing when we need to change the case of a dimension member. To demonstrate this problem, I created a very simple table:
As you can see it is a very simple table

And then I just created a tabular model based on this simple table.

Now I bring in the Power BI to visualise the product name by country

So far everything is good. But assume CN's manager wants to make some formatting changes: I want to see the product name in proper case, "Bike". Looks very simple, doesn't it? So we go to the database, update product name to proper case, re-process the model.

Now refresh the report, nothing happens!

What happened? You can find the reason here. In short, it is because tabular model uses columnar storage mode, so for the same string value, it will only save the first instance regardless of its form. So in tabular model, "BIKE", "bike", "Bike", and "biKE" are all saved as one entry "BIKE". So now doesn't mater how many times you update your data, or re-process your tabular model, the report will always show "BIKE" as the product name.
To approve this, let's update all "BIKE" to "Bike" now, then re-process the model.

Now we go back to the PBI report and refresh it.

So here is the conclusion. When we design the data model, usually we will denormalise the data to build the dimension, which obviously, will generate lots of duplicated entries. When there is a requirement to show members in different forms, we need to be very careful due to the storage mode. In my practice, I would suggest to have a format string field build into the model.
To begin with 2019, I just want to keep it simple. Let's see a small problem I found in SSAS tabular model recently: It could be very confusing when we need to change the case of a dimension member. To demonstrate this problem, I created a very simple table:
use master
go

create database demo
go

use demo
go

if exists (select 1 from sys.tables where name = 'product')
drop table product
go

create table PRODUCT
(
ProductKey int identity(1,1),
ProductName varchar(100),
Country varchar(100),
Constraint PK_Product Primary Key (ProductKey)
)
go

Insert into Product(ProductName, Country)
values
('BIKE', 'AU'),
('BIKE', 'UK'),
('BIKE', 'US'),
('BIKE', 'CN'),
('BIKE', 'NZ')
go

Select * from PRODUCT
As you can see it is a very simple table

And then I just created a tabular model based on this simple table.
Now I bring in the Power BI to visualise the product name by country

So far everything is good. But assume CN's manager wants to make some formatting changes: I want to see the product name in proper case, "Bike". Looks very simple, doesn't it? So we go to the database, update product name to proper case, re-process the model.
Update PRODUCT set ProductName = 'Bike' where Country = 'CN'

Now refresh the report, nothing happens!

What happened? You can find the reason here. In short, it is because tabular model uses columnar storage mode, so for the same string value, it will only save the first instance regardless of its form. So in tabular model, "BIKE", "bike", "Bike", and "biKE" are all saved as one entry "BIKE". So now doesn't mater how many times you update your data, or re-process your tabular model, the report will always show "BIKE" as the product name.
To approve this, let's update all "BIKE" to "Bike" now, then re-process the model.

Now we go back to the PBI report and refresh it.

So here is the conclusion. When we design the data model, usually we will denormalise the data to build the dimension, which obviously, will generate lots of duplicated entries. When there is a requirement to show members in different forms, we need to be very careful due to the storage mode. In my practice, I would suggest to have a format string field build into the model.
2018-11-29
Power BI: Parameter Table and Dynamic Date Range
As we know Power BI is all about filter context, which brings us quite a lot convenience. But for some cases, it might not be what we want. For instance, what if I want to show amount of sales for last N months by a calendar month slicer? Because the slicer puts a constraint on the calendar month, you won't be able to show sales amount month by month. As illustrated below, how can we see total sales for 2012-12, 2012-11, etc.?

Normally what we can do is creating a disconnected date dimension, and using this disconnected date dimension for the slicer. But sometimes it could be very confusing to end users. So instead of creating a second date dimension, we can try to use date member from the fact table directly. So let's start today's topic:
Firstly the demonstration I built is from AdventureWorksDW2014.
To make it simple, I only loaded DimDate and FactInternetSales tables. Then, I removed default relationships and create the date relationship between FullDateAlternateKey and OrderDate columns directly.

Finally I created a custom column in the DimDate table for calendar month:
Calendar Month = FORMAT(DimDate[FullDateAlternateKey], "yyyy-MM")
Then we need a parameter table, which gives us control of how many months of sales user wants to see. In the real world scenario, we may need to create a junk dimension to hold these values. But in this demonstration, I just manually input the data.

Now let's create two simple measures:
Total Sales = SUM(FactInternetSales[SalesAmount])
Selected Period = IF(HASONEVALUE('Parameter Table'[Parameter Value]), VALUES('Parameter Table'[Parameter Value]))
If we follow normal steps to create visuals (create a slicer from 'DimDate'[Calendar Month], create a slicer from 'Parameter Table'[Parameter Name], then drop the table visual for calendar month and total sales), you will find the table visual won't show last N months sales, because the calendar month slicer puts a filter context to the fact table.
So let's make three changes to make it work:
1. add a calculate order month column into the fact table
Order Month = FORMAT(FactInternetSales[OrderDate], "yyyy-MM" )
2. add a measure for total sales of last N months. (note: Max function gives us the last date within the current filter context - the calendar month slicer value in this case)
Sales (in period) = CALCULATE([Total Sales], DATESINPERIOD(DimDate[FullDateAlternateKey], MAX(DimDate[FullDateAlternateKey]), -[Selected Period], MONTH))
3. now instead of using 'DimDate'[Calendar Month] and [Total Sales] for the table, we drag and drop 'FactInternetSales'[Order Month] and [Sales (in period)] into the table visual.

Easy job, isn't it? :D

Normally what we can do is creating a disconnected date dimension, and using this disconnected date dimension for the slicer. But sometimes it could be very confusing to end users. So instead of creating a second date dimension, we can try to use date member from the fact table directly. So let's start today's topic:
Firstly the demonstration I built is from AdventureWorksDW2014.
To make it simple, I only loaded DimDate and FactInternetSales tables. Then, I removed default relationships and create the date relationship between FullDateAlternateKey and OrderDate columns directly.

Finally I created a custom column in the DimDate table for calendar month:
Calendar Month = FORMAT(DimDate[FullDateAlternateKey], "yyyy-MM")
Then we need a parameter table, which gives us control of how many months of sales user wants to see. In the real world scenario, we may need to create a junk dimension to hold these values. But in this demonstration, I just manually input the data.
Now let's create two simple measures:
Total Sales = SUM(FactInternetSales[SalesAmount])
Selected Period = IF(HASONEVALUE('Parameter Table'[Parameter Value]), VALUES('Parameter Table'[Parameter Value]))
If we follow normal steps to create visuals (create a slicer from 'DimDate'[Calendar Month], create a slicer from 'Parameter Table'[Parameter Name], then drop the table visual for calendar month and total sales), you will find the table visual won't show last N months sales, because the calendar month slicer puts a filter context to the fact table.
So let's make three changes to make it work:
1. add a calculate order month column into the fact table
Order Month = FORMAT(FactInternetSales[OrderDate], "yyyy-MM" )
2. add a measure for total sales of last N months. (note: Max function gives us the last date within the current filter context - the calendar month slicer value in this case)
Sales (in period) = CALCULATE([Total Sales], DATESINPERIOD(DimDate[FullDateAlternateKey], MAX(DimDate[FullDateAlternateKey]), -[Selected Period], MONTH))
3. now instead of using 'DimDate'[Calendar Month] and [Total Sales] for the table, we drag and drop 'FactInternetSales'[Order Month] and [Sales (in period)] into the table visual.

Easy job, isn't it? :D
2018-11-24
Pull Exchange email attachment via Exchange Service Binding
To be honest, I had never thought there would be a need to pull attachment from on-premise Exchange Server via Exchange Service Binding, in the year of 2018. But I was wrong :(
Basically we have two ways to read email from on-premise Exchange. The first option is utilizing Exchange Web Service managed API. It can be used for both on-premise Exchange server and O365 (an example I blogged before). The other option is today's topic: Exchange Service Binding, which by any means, should be avoid! Now let's have a look the basic routine:
To locate the root folder of the account (NOT the inbox folder)
After we have the root, we can navigate to the specific folder by folder name, inbox, archive, deleted folder, whatever you like :)
Now we can get all email items from the folder we located
Now here is a very important concept: if you google Exchange Service Binding, you will find the concept of the attachment in ESB is a bid confusing: the Attachments property returned from email ItemType is not the actual attachment itself. So we need to get the item id of the attachment, then we can get the actual attachment from the item id. Below is the code to construct a dictionary object for attachment id and attachment name:
Then we can get the attachment and save to the disk
Basically we have two ways to read email from on-premise Exchange. The first option is utilizing Exchange Web Service managed API. It can be used for both on-premise Exchange server and O365 (an example I blogged before). The other option is today's topic: Exchange Service Binding, which by any means, should be avoid! Now let's have a look the basic routine:
- find the root of the email account;
- locate the base email folder (normally it should be the inbox folder);
- pull emails from the base folder;
- get email attachments' id from the email item;
- pull attachments from email by attachment item id;
To locate the root folder of the account (NOT the inbox folder)
        public static string GetRootFolder(ExchangeServiceBinding esb)
        {
            DistinguishedFolderIdType[] dfit = new DistinguishedFolderIdType[1];

            dfit[0] = new DistinguishedFolderIdType();
            dfit[0].Id = DistinguishedFolderIdNameType.root;

            FolderResponseShapeType frst = new FolderResponseShapeType();
            frst.BaseShape = DefaultShapeNamesType.AllProperties;

            GetFolderType gftRoot = new GetFolderType();
            gftRoot.FolderIds = dfit;

            gftRoot.FolderShape = frst;
            GetFolderResponseType gfrt = esb.GetFolder(gftRoot);
            FolderInfoResponseMessageType firmt = ((FolderInfoResponseMessageType)gfrt.ResponseMessages.Items[0]);

            if (firmt.ResponseClass == ResponseClassType.Success)
                return ((FolderInfoResponseMessageType)gfrt.ResponseMessages.Items[0]).Folders[0].FolderId.Id;
            else
                return null;

        }
After we have the root, we can navigate to the specific folder by folder name, inbox, archive, deleted folder, whatever you like :)
        public static BaseFolderType GetFolder(ExchangeServiceBinding esb, string parentFolderId, string folderName)
        {
            if (esb == null || string.IsNullOrEmpty(parentFolderId))
                return null;

            FolderIdType[] fit = new FolderIdType[1];
            fit[0] = new FolderIdType();
            fit[0].Id = parentFolderId;

            FolderResponseShapeType frst = new FolderResponseShapeType();
            frst.BaseShape = DefaultShapeNamesType.AllProperties;

            PathToUnindexedFieldType ftFolderName = new PathToUnindexedFieldType();
            ftFolderName.FieldURI = UnindexedFieldURIType.folderDisplayName;

            ConstantValueType cvt = new ConstantValueType();
            cvt.Value = folderName;

            FieldURIOrConstantType ctFolderName = new FieldURIOrConstantType();
            ctFolderName.Item = cvt;

            ContainsExpressionType cet = new ContainsExpressionType();
            cet.Constant = cvt;
            cet.Item = ftFolderName;
            cet.ContainmentComparison = ContainmentComparisonType.IgnoreCase;
            cet.ContainmentComparisonSpecified = true;
            cet.ContainmentMode = ContainmentModeType.FullString;
            cet.ContainmentModeSpecified = true;
            RestrictionType rt = new RestrictionType();
            rt.Item = cet;

            FindFolderType fft = new FindFolderType();
            fft.Traversal = FolderQueryTraversalType.Deep;
            fft.ParentFolderIds = fit;
            fft.FolderShape = frst;
            fft.Restriction = rt;

            FindFolderResponseType ffrt = esb.FindFolder(fft);

            ResponseMessageType rmt = ((ResponseMessageType)ffrt.ResponseMessages.Items[0]);

            if (rmt.ResponseClass == ResponseClassType.Success)
            {
                BaseFolderType[] bfts = ((FindFolderResponseMessageType)ffrt.ResponseMessages.Items[0]).RootFolder.Folders;
                if (bfts.GetLength(0) > 0)
                    return bfts[0];
                else
                    return null;
            }
            else
                return null;
        }
Now we can get all email items from the folder we located
public static ListGetEmailItems(ExchangeServiceBinding esb) { List lstItems = new List (); FindItemType fitRequest = new FindItemType(); fitRequest.Traversal = ItemQueryTraversalType.Shallow; ItemResponseShapeType irst = new ItemResponseShapeType(); irst.BaseShape = DefaultShapeNamesType.AllProperties; fitRequest.ItemShape = irst; DistinguishedFolderIdType[] dfits = new DistinguishedFolderIdType[1]; dfits[0] = new DistinguishedFolderIdType(); dfits[0].Id = DistinguishedFolderIdNameType.inbox; fitRequest.ParentFolderIds = dfits; FindItemResponseType fitResponse = esb.FindItem(fitRequest); FindItemResponseMessageType findItemResponseMessageType = (FindItemResponseMessageType)fitResponse.ResponseMessages.Items[0]; var responseContents = findItemResponseMessageType.RootFolder.Item; var items = ((ArrayOfRealItemsType)responseContents).Items; if (items != null && items.Length > 0) { foreach (var item in items) { lstItems.Add(item); } } return lstItems; }
Now here is a very important concept: if you google Exchange Service Binding, you will find the concept of the attachment in ESB is a bid confusing: the Attachments property returned from email ItemType is not the actual attachment itself. So we need to get the item id of the attachment, then we can get the actual attachment from the item id. Below is the code to construct a dictionary object for attachment id and attachment name:
public static DictionaryGetAttachments(ExchangeServiceBinding esb, ItemIdType itemId) { Dictionary attachments = new Dictionary (); GetItemType gitRequest = new GetItemType(); gitRequest.ItemIds = new ItemIdType[] { itemId }; gitRequest.ItemShape = new ItemResponseShapeType(); gitRequest.ItemShape.BaseShape = DefaultShapeNamesType.AllProperties; PathToUnindexedFieldType hasAttachPath = new PathToUnindexedFieldType(); hasAttachPath.FieldURI = UnindexedFieldURIType.itemHasAttachments; PathToUnindexedFieldType attachmentsPath = new PathToUnindexedFieldType(); attachmentsPath.FieldURI = UnindexedFieldURIType.itemAttachments; gitRequest.ItemShape.AdditionalProperties = new BasePathToElementType[] { hasAttachPath, attachmentsPath }; GetItemResponseType giResponse = esb.GetItem(gitRequest); ItemInfoResponseMessageType iirm = (ItemInfoResponseMessageType)giResponse.ResponseMessages.Items[0]; if (iirm.ResponseCode == ResponseCodeType.NoError) { ItemType it = iirm.Items.Items[0]; if (it.HasAttachments && it.Attachments != null && it.Attachments.Length > 0) { foreach (AttachmentType attachmentItem in it.Attachments) { FileAttachmentType fat = (FileAttachmentType)attachmentItem; if (fat != null) { attachments.Add(fat.AttachmentId.Id, fat.Name); } } } } return attachments; }
Then we can get the attachment and save to the disk
        public static void GetAttachmentsOnItem(ExchangeServiceBinding esb, ItemIdType itemId, string destPath)
        {
            GetItemType gitRequest = new GetItemType();
            gitRequest.ItemIds = new ItemIdType[] { itemId };
            gitRequest.ItemShape = new ItemResponseShapeType();

            gitRequest.ItemShape.BaseShape = DefaultShapeNamesType.IdOnly;

            PathToUnindexedFieldType hasAttachPath = new PathToUnindexedFieldType();
            hasAttachPath.FieldURI = UnindexedFieldURIType.itemHasAttachments;

            PathToUnindexedFieldType attachmentsPath = new PathToUnindexedFieldType();
            attachmentsPath.FieldURI = UnindexedFieldURIType.itemAttachments;
            gitRequest.ItemShape.AdditionalProperties = new BasePathToElementType[] { hasAttachPath, attachmentsPath };

            GetItemResponseType getItemResponse = esb.GetItem(gitRequest);

            ItemInfoResponseMessageType getItemResponseMessage = (ItemInfoResponseMessageType)getItemResponse.ResponseMessages.Items[0];

            if (getItemResponseMessage.ResponseCode == ResponseCodeType.NoError)
            {
                ItemType item = getItemResponseMessage.Items.Items[0];

                if (item.HasAttachments && (item.Attachments != null) && (item.Attachments.Length > 0))
                {
                    List lstRait = new List();

                    for (int attachmentIndex = 0; attachmentIndex < item.Attachments.Length; attachmentIndex++)
                    {
                        FileAttachmentType fat = (FileAttachmentType)item.Attachments[attachmentIndex];
                        if (fat != null)
                        {
                            RequestAttachmentIdType rait = new RequestAttachmentIdType();
                            rait.Id = fat.AttachmentId.Id;
                            lstRait.Add(rait);
                        }
                    }

                    GetAttachmentType gat = new GetAttachmentType();
                    gat.AttachmentShape = new AttachmentResponseShapeType();
                    gat.AttachmentIds = lstRait.ToArray();

                    GetAttachmentResponseType getAttachmentResponse = esb.GetAttachment(gat);

                    foreach (AttachmentInfoResponseMessageType attachmentResponseMessage in getAttachmentResponse.ResponseMessages.Items)
                    {
                        if (attachmentResponseMessage.ResponseCode == ResponseCodeType.NoError)
                        {
                            FileAttachmentType fileAttachment = attachmentResponseMessage.Attachments[0] as FileAttachmentType;

                            using (FileStream file = File.Create(Path.Combine(destPath, fileAttachment.Name)))
                            {

                                file.Write(fileAttachment.Content, 0, fileAttachment.Content.Length);
                                file.Flush();
                                file.Close();
                            }

                        }

                    }

                }

            }

        }
2018-10-28
Copy Azure Blob via Rest API
Recently I was requested to work on a data procedure. Basically what I need to do is using SSIS to copy files between different Azure blob storage folders (allow me to use this term, I know there is no such concept in Azure blob. It is just for simplicity :P ).
It is a quite simple task if you can reference Microsoft.WindowsAzure.Storage dll in your package. But in my case the SSIS server doesn't have it. So I decided to use Azure Blob Rest API -- independent to the host environment.
The Azure Blob API's office document gives us a very clear explanation. To call the API, we need to identify the resource, create authorization header, and then issue the web request. But the problem is, I couldn't find any resource to tell you how to create the authorization header for copy. So if you are facing the same problem, continue to section below...
The first step is to create a helper method to generate authorization header, very standard implementation:
The second step is to declare our variables
Here is a very important step: we need to create the string for sign. Each line in this string has different meaning, and you can find detailed explanation here. Fortunately we just need to populate mandatory components, like this:
Notice here the version I used is 2015-04-05. Technically you should be able to use any version Microsoft provided, e.g. the latest is 2018-03-28.
Now we have the string, then we only need to sign this string, and issue the web request
Enjoy :)
It is a quite simple task if you can reference Microsoft.WindowsAzure.Storage dll in your package. But in my case the SSIS server doesn't have it. So I decided to use Azure Blob Rest API -- independent to the host environment.
The Azure Blob API's office document gives us a very clear explanation. To call the API, we need to identify the resource, create authorization header, and then issue the web request. But the problem is, I couldn't find any resource to tell you how to create the authorization header for copy. So if you are facing the same problem, continue to section below...
The first step is to create a helper method to generate authorization header, very standard implementation:
        public static String SignThis(String stringToSign, string accountKey, string accountName)
        {
            String signature = string.Empty;
            byte[] unicodeKey = Convert.FromBase64String(accountKey);
            using (HMACSHA256 hmacSha256 = new HMACSHA256(unicodeKey))
            {
                Byte[] dataToHmac = System.Text.Encoding.UTF8.GetBytes(stringToSign);
                signature = Convert.ToBase64String(hmacSha256.ComputeHash(dataToHmac));
            }

            String authorizationHeader = String.Format(
                  CultureInfo.InvariantCulture,
                  "{0} {1}:{2}",
                  "SharedKey",
                  accountName,
                  signature);

            return authorizationHeader;
        }
The second step is to declare our variables
            string accountKey = "my acccount key";
            string accountName = "my account name";

            string srcBlob = "source blob name";
            string destBlob = "destination blob name";

            string containerName = "my blob container name";

            string method = "PUT";
            DateTime dt = DateTime.UtcNow;

            string reqUrl = @"https://" + accountName + ".blob.core.windows.net/" + containerName + "/" + destBlob;
            string copySource = @"https://" + accountName + ".blob.core.windows.net/" + containerName + "/" + srcBlob;
            string canonicalizedHeaders = string.Format("/{0}/{1}/{2}", accountName, containerName, destBlob);
Here is a very important step: we need to create the string for sign. Each line in this string has different meaning, and you can find detailed explanation here. Fortunately we just need to populate mandatory components, like this:
            string StringToSign = String.Format(
                method + "\n"
                + "\n" // content encoding
                + "\n" // content language
                + "\n" // content length
                + "\n" // content md5
                + "\n" // content type
                + "\n" // date
                + "\n" // if modified since
                + "\n" // if match
                + "\n" // if none match
                + "\n" // if unmodified since
                + "\n" // range
                + "x-ms-copy-source:" + copySource + "\nx-ms-date:" + dt.ToString("R") + "\nx-ms-version:2015-04-05\n"
                + canonicalizedHeaders);
Notice here the version I used is 2015-04-05. Technically you should be able to use any version Microsoft provided, e.g. the latest is 2018-03-28.
Now we have the string, then we only need to sign this string, and issue the web request
            string auth = SignThis(StringToSign, accountKey, accountName);

            Uri reqUri = new Uri(reqUrl);

            HttpWebRequest request = (HttpWebRequest)WebRequest.Create(reqUri);
            request.Method = method;
            request.Headers.Add("x-ms-date", dt.ToString("R"));
            request.Headers.Add("x-ms-version", "2015-04-05");
            request.Headers.Add("Authorization", auth);
            request.ContentLength = 0;
            request.Headers.Add("x-ms-copy-source", copySource);

            using (var response = request.GetResponse())
            {
                var status = ((HttpWebResponse)response).StatusCode;

                if (status != HttpStatusCode.Accepted)
                {
                    Dts.TaskResult = (int)ScriptResults.Failure;
                }
                else
                {
                    Dts.TaskResult = (int)ScriptResults.Success;
                }
            }
Enjoy :)
2018-09-25
Power BI/Power Query: Load JIRA Issues in Parallel
For nearly a year I haven't done any posting, as I was doing some works not relevant to SQL things, AR/MR with Unity, Machine Learning/Deep Learning, and Flask development. Now I am back to data related works so hopefully I will restart blogging my data experience. Let's see what we can do today.

Then based on this ufnGetJson function, we can get total amount of issues and split the stream to multiple batches (5 batches in below example)
Code listed above provides us with a boundary of the issue numbers we need to call. Now we just need to create 5 datasets and call the function separately, but keep in mind, we need to provide different n value. e.g. to get the first batch we can have the query like below
The last step is simply creating a new dataset by combining all 5 datasets into one.

At my end this approach improves loading speed a lot, but obviously it depends on connection capacity. Let me know if there is any problem :)
Due to performance issue, JIRA made the decision to limit amount of records returned from its Rest API to 100 (here). But what if we are working on a large number of issues? like this
So we need to make the API call for more than 200 times. So depends on business requirement, the Power BI report could be just too long to refresh.
An alternative way to handle large amount of issues is we call the API in parallel. To do that, firstly let's create a basic function ufnGetJson to call the API (replace the Organization place holder with correct value):
 (nStartAt) =>
     let
       query = Json.Document(Web.Contents("https://{organization}.atlassian.net/rest/api/2/search?maxResults=100&startAt=" & Number.ToText(nStartAt)))
     in
       query
Then based on this ufnGetJson function, we can get total amount of issues and split the stream to multiple batches (5 batches in below example)
 ufnGetRange
 (n) =>
     let
       tmpResult = ufnGetJson(0),
       totalItem = tmpResult[total],
       cnt = totalItem / 5,
       returnRange = {(n-1) * Number.RoundDown(cnt)..n * Number.RoundUp(cnt)}
     in
       returnRange
Code listed above provides us with a boundary of the issue numbers we need to call. Now we just need to create 5 datasets and call the function separately, but keep in mind, we need to provide different n value. e.g. to get the first batch we can have the query like below
 let
   rng = ufnGetRange(1),
   startAt = List.Min(rng),
   boundary = List.Max(rng),
   pages = {Number.RoundDown(startAt/100)..Number.RoundDown(boundary/100)},
   pageRange = List.Transform(pages, each _ * 100),
   paginated = List.Transform(pageRange, each ufnGetJson(_)),
   #"Converted to Table" = Table.FromList(paginated, Splitter.SplitByNothing(), null, null, ExtraValues.Error)
 in
   #"Converted to Table"
The last step is simply creating a new dataset by combining all 5 datasets into one.
 let
   combined = Table.Combine({#"Issue Batch 1", #"Issue Batch 2", #"Issue Batch 3", #"Issue Batch 4", #"Issue Batch 5"}),
      ....
      ....
      ....
At my end this approach improves loading speed a lot, but obviously it depends on connection capacity. Let me know if there is any problem :)
2017-11-28
API Response Pagination - SSIS
In my previous posts, I demonstrated how to paginate API response in Power Query. But what if we need to do a pagination via SSIS? As far as I know, at this stage there is no generic Rest connector available in SSIS. Therefore, we have to use script component/task to read response from the Rest API.
To show you the approach in a quick way, let's write some codes to replicate the scenario I demonstrated in this post. Firstly I created below function:
Clearly, this function will extract response body from the Rest API (here we assume the API uses HTTP header "Key" for authorization purpose).
So now we have the base method to call the API, what we need to do is creating a recursive routine, so that we can read the next page until nothing returns:
As you can see, I defined a Boolean variable to control the While loop. And in each loop, I read length of the Json response to determine if we should read next page.
Simple approach, isn't it? Though it looks like we have to write more lines of code when compare to power query, SSIS does have its own advantages, such as data quality control. Until my next post, enjoy the pagination.
To show you the approach in a quick way, let's write some codes to replicate the scenario I demonstrated in this post. Firstly I created below function:
private static string callAPI(HttpClient client, string key, string endPoint)
    {
        string jsonBody;

        var header = new MediaTypeWithQualityHeaderValue("application/json");
        client.DefaultRequestHeaders.Accept.Add(header);

        client.DefaultRequestHeaders.Authorization = new AuthenticationHeaderValue("Key", key);

        HttpResponseMessage response = client.GetAsync(endPoint).Result;

        jsonBody = response.Content.ReadAsStringAsync().Result;

        return jsonBody;
    }
Clearly, this function will extract response body from the Rest API (here we assume the API uses HTTP header "Key" for authorization purpose).
So now we have the base method to call the API, what we need to do is creating a recursive routine, so that we can read the next page until nothing returns:
            bool tryNextPage = true;

            using (HttpClient client = new HttpClient())
            {
                while (tryNextPage)
                {
                    string jBody = callAPI(client, key, endPoint);

                    if (jBody.Length > 50)
                    {
                        ResponseBuffer.AddRow();
                        ResponseBuffer.JsonBody.AddBlobData(System.Text.Encoding.UTF8.GetBytes(jBody));

                        int page = int.Parse(endPoint.Substring(endPoint.Length - 1, 1));

                        endPoint = endPoint.Substring(0, endPoint.Length - 1) + (page + incremental).ToString();
                    }
                    else
                    {
                        tryNextPage = false;
                    }

                }


            }
As you can see, I defined a Boolean variable to control the While loop. And in each loop, I read length of the Json response to determine if we should read next page.
Simple approach, isn't it? Though it looks like we have to write more lines of code when compare to power query, SSIS does have its own advantages, such as data quality control. Until my next post, enjoy the pagination.
2017-10-01
Power BI/Power Query: API Response Pagination Part 3 - Missing Indicator
This is the 3rd post about pagination in Power BI/Power Query.
In part 1 and part 2 we have discussed how to paginate Restful response if the response contains a total item Count or a next page Token. So what if the response only returns us records, without any indicator about the next page?
Let's take a look on Basecamp todo API. If we call the API at the end point /api/v1/projects/{project id}/todos.json?page=1, the begin of the response and the end of the response look like below screenshots:
Sorry for the messy screenshots, but the point is, this API doesn't give us a token for next page. We have to query the next page to ensure our API call pulls all records we need. You might have hundreds of ways to do the job, but my first impression is let's create a recursive function. Let's think about the problem:
1. We receive the first page from the response and merge the records into a table "T";
2. Then we move on to the next page
2.1 If the next page contains records then we repeat step 1 (merge records into "T") and step 2
2.2 If there is no records in the next page, then we stop and return the table "T"
It is simply a classic recursive scenario. In Power Query, the recursive function is all about the "@". Let's look at the codes
As you can see, the key function in codes above is the 2nd function, in the function body, we check amount of records returned from the call, and if the amount is greater than 0, we recursively (@) call the function by passing the merged table and next page number. Simple enough, right?

In part 1 and part 2 we have discussed how to paginate Restful response if the response contains a total item Count or a next page Token. So what if the response only returns us records, without any indicator about the next page?
Let's take a look on Basecamp todo API. If we call the API at the end point /api/v1/projects/{project id}/todos.json?page=1, the begin of the response and the end of the response look like below screenshots:
 | |
| begin of the response |
 |
| end of the response |
Sorry for the messy screenshots, but the point is, this API doesn't give us a token for next page. We have to query the next page to ensure our API call pulls all records we need. You might have hundreds of ways to do the job, but my first impression is let's create a recursive function. Let's think about the problem:
1. We receive the first page from the response and merge the records into a table "T";
2. Then we move on to the next page
2.1 If the next page contains records then we repeat step 1 (merge records into "T") and step 2
2.2 If there is no records in the next page, then we stop and return the table "T"
It is simply a classic recursive scenario. In Power Query, the recursive function is all about the "@". Let's look at the codes
let
    ufnQuery = (n) =>
        let
            jsonDoc= Json.Document(
                        Web.Contents(
                            "https://basecamp.com/{domain}/api/v1/projects/{project id}/todos.json?page=" & Number.ToText(n),
                            [Headers=[Authorization="Basic {the key}"]]
                        )
        ),
        tmpTbl = Table.FromList(jsonDoc, Splitter.SplitByNothing(), null, null, ExtraValues.Error)
    in
        tmpTbl,

    fnRecursive = (tbl, n) =>
        if Table.RowCount(ufnQuery(n)) > 0 then @fnRecursive(Table.Combine({tbl, ufnQuery(n)}), n+1) else tbl,

    tbl = ufnQuery(1),
    result = fnRecursive(tbl, 2)
in
   result
As you can see, the key function in codes above is the 2nd function, in the function body, we check amount of records returned from the call, and if the amount is greater than 0, we recursively (@) call the function by passing the merged table and next page number. Simple enough, right?

2017-09-17
Power BI/Power Query: API Response Pagination Part 2 - Paginate by Page Cursor
This is the 2nd post of the topic API Response Pagination in Power BI/Power Query. You can find the first post here.
In the first post we have seen an API pagination example in Power Query, in which the API response provides us with the total record count, then we can calculate amount of pages we need to query. So today let's see another typical scenario in API response: the response contains an cursor pointing to the next page. (Here the cursor could be a direct link brings you to the next page, or it could be a page token you need to apply to your next API call).
The example I demonstrated today is Youtube Search API, and the channel I am going to search is VicRoad (as this post is focusing on result pagination, I am not going to explain how to prepare the API call :P). Below is a well-formatted Json response returned from the call. As you can see, the key field (the cursor) we are going to use is "nextPageToken".

Similar to the last post, the first step is preparing a base call function, as shown below. However, this time we return a list, which contains the result set of the current call, as well as the nextPageToken field we can use for drilling calls.

Now here is the core function of today's topic: List.Generate(). Basically you can treat this function as the FOR loop: we initialize a variable, give it a stop condition, specify the incremental action to the variable, and finally populate the return list result. Below is what I wrote:
 So what we did is quite clear now: we create a helper function to call the API; Inside the List.Generate() function, we call the function to repeatedly populate records on different pages by using nextPageToken value. So what we need to do is just turning the result to table? Hold on for one second!
Let's review this piece of codes. So initially we call the API without page token, and the return result set contains records from page 1 and token for page 2, hence the second call gives us records from page 2 and token for page 3...
Now you see the problem: our condition for generating the list is "for each NOT NULL nextPageToken". We haven't gone through the last page!
Fixing the problem is quite simple, we can just manually query the last page, and then combine the result sets:
 Put all together:
Now Run the query we should have all the records we need.

In the first post we have seen an API pagination example in Power Query, in which the API response provides us with the total record count, then we can calculate amount of pages we need to query. So today let's see another typical scenario in API response: the response contains an cursor pointing to the next page. (Here the cursor could be a direct link brings you to the next page, or it could be a page token you need to apply to your next API call).
The example I demonstrated today is Youtube Search API, and the channel I am going to search is VicRoad (as this post is focusing on result pagination, I am not going to explain how to prepare the API call :P). Below is a well-formatted Json response returned from the call. As you can see, the key field (the cursor) we are going to use is "nextPageToken".

Similar to the last post, the first step is preparing a base call function, as shown below. However, this time we return a list, which contains the result set of the current call, as well as the nextPageToken field we can use for drilling calls.

Now here is the core function of today's topic: List.Generate(). Basically you can treat this function as the FOR loop: we initialize a variable, give it a stop condition, specify the incremental action to the variable, and finally populate the return list result. Below is what I wrote:

Let's review this piece of codes. So initially we call the API without page token, and the return result set contains records from page 1 and token for page 2, hence the second call gives us records from page 2 and token for page 3...
Now you see the problem: our condition for generating the list is "for each NOT NULL nextPageToken". We haven't gone through the last page!
Fixing the problem is quite simple, we can just manually query the last page, and then combine the result sets:

let
    ufnGetList = (pgToken) =>
        let
            result = Json.Document(
                        Web.Contents("https://www.googleapis.com/youtube/v3/search?part=snippet&channelId=UCkT7-rjW_Foojt0ZRtbXMdA&maxResults=50&type=video&key=[put your api key here]&pageToken=" & pgToken)
                        ),
            nextPageToken = try result[nextPageToken] otherwise null,
            items = result[items],
            record = [items = items, nextPageToken = nextPageToken]
        in
            record,

    resultSet = List.Generate(
                    () => ufnGetList(""),
                    each _[nextPageToken] <> null,
                    each ufnGetList(_[nextPageToken]),
                    each [nextPageToken = _[nextPageToken], items = _[items]]
                    ),

    lastPageToken = List.Last(Table.FromRecords(resultSet)[nextPageToken]),
    lastResultSet = ufnGetList(lastPageToken)[items],

    fullResultSet = Table.Combine({Table.FromRecords(List.Combine(Table.FromRecords(resultSet)[items])), Table.FromRecords(lastResultSet)})


in
    fullResultSet
Now Run the query we should have all the records we need.

2017-09-03
Power BI/Power Query: API Response Pagination Part 1 - Paginate by Item Count
It has been a while since my last post, lots of things happened in these few month, changed my career path, obtained my certification... Finally I got a chance to sit down and restart the blog. So today's topic is pagination in REST API response.
As you can see in the past I had done a few posts of how to consume API results in SSIS via script components, such as this post. But in Power BI, it might not be as easy as what we did in the script component, because there is no direct way to do a loop when reading paginated response.
Generally there are two types of paginated result set:
-- Good: A Json response contains an indicator to provide you with the information of the next page, it could be a link for the next page, or it could be a token for you to issue the next call, or it could be a total item count so you need to do a calculation of how many pages you need to go through. This is today's topic.
-- Cursed: A Json result set does not have pagination information, so you need to query next page every time until the the response gives us nothing.
So, let's prepare today's post here. To demonstrate the logic, I am using the v3 SET (/api/v3/lego/sets) API from rebrickable. The API itself is quite simple, but you need to create an account, then generate a API key from your account profile to call the API. It is a simple process so I won't cover it here.
After we obtain the API key, it is time to open the Power Query window in Power BI

From opened query window, select Web as the data source

In the pop up window, select Advanced option, and then input API endpoint and key value, as you can see below, I set page size to 100, and the initial page is 1.

Click the OK button and the query should run automatically and give you the result. As you can see the response is quite clear: it provides you total items in the result set, as well as the link you should use to visit the next page. In this example, I am going to use the "count" indicator to do the loop.

Now Power Query has built the basic routine for us. We need to manually modify the query
to return the result page by page. So firstly we open the query edit window by click Advanced Editor

Our query looks like screenshot captured below

In the query editor window, I transform the query into a function, nothing special, it simply accepts a page number and then return the Json response.

Here is the key part:

And the result returned from the query:
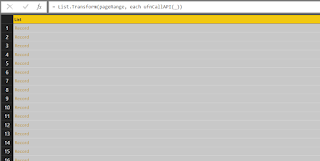 (note: 100/page might be too small to issue the call, if it is too slow, you can try to change the page_size parameter to 1000 in the function definition, as well as the pageRange list boundary to {1..Number.RoundUp(totalItems/1000)} )
As you can see, though there is no loop function available in Power Query (at this stage), we can still retrieve paginated API responses by using provided paging indicator. In my next post, I will cover the topic of how to handle no indicator response in Power Query. Enjoy.
As you can see in the past I had done a few posts of how to consume API results in SSIS via script components, such as this post. But in Power BI, it might not be as easy as what we did in the script component, because there is no direct way to do a loop when reading paginated response.
Generally there are two types of paginated result set:
-- Good: A Json response contains an indicator to provide you with the information of the next page, it could be a link for the next page, or it could be a token for you to issue the next call, or it could be a total item count so you need to do a calculation of how many pages you need to go through. This is today's topic.
-- Cursed: A Json result set does not have pagination information, so you need to query next page every time until the the response gives us nothing.
So, let's prepare today's post here. To demonstrate the logic, I am using the v3 SET (/api/v3/lego/sets) API from rebrickable. The API itself is quite simple, but you need to create an account, then generate a API key from your account profile to call the API. It is a simple process so I won't cover it here.
After we obtain the API key, it is time to open the Power Query window in Power BI

From opened query window, select Web as the data source

In the pop up window, select Advanced option, and then input API endpoint and key value, as you can see below, I set page size to 100, and the initial page is 1.

Click the OK button and the query should run automatically and give you the result. As you can see the response is quite clear: it provides you total items in the result set, as well as the link you should use to visit the next page. In this example, I am going to use the "count" indicator to do the loop.

to return the result page by page. So firstly we open the query edit window by click Advanced Editor

Our query looks like screenshot captured below

In the query editor window, I transform the query into a function, nothing special, it simply accepts a page number and then return the Json response.

Here is the key part:
- We pull the total item count from the initial call
- Then we generate a list for page numbers
- For each list item, we call the ufnCallAPI function

And the result returned from the query:

As you can see, though there is no loop function available in Power Query (at this stage), we can still retrieve paginated API responses by using provided paging indicator. In my next post, I will cover the topic of how to handle no indicator response in Power Query. Enjoy.
2017-06-01
T-SQL Recipie: Generate XML/JSON Output
Change of Circumstances
Life is about change, I had never thought one day I would work in a Java/HP Vertica powered cloud BI environment. But it is the fact. How amazing it is...
So I am going to add a few things different to MS techs in the future, some techs related to my current job. So if you see something different to my previous post, don't worry, it is still me :P
Now back to the topic, one of my previous colleagues dropped a question to me today. Basically the core of the question is how to reflect parent/child relationship when exporting query result into XML/JSON. It is quite a common scenario today, so have a quick look at below code:
So if we run the code listed above:
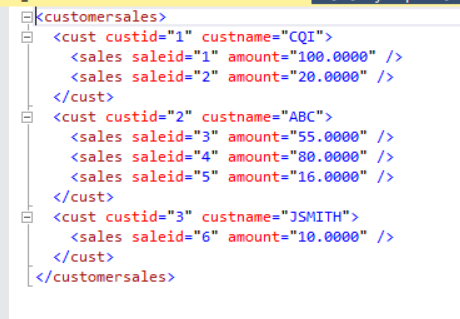
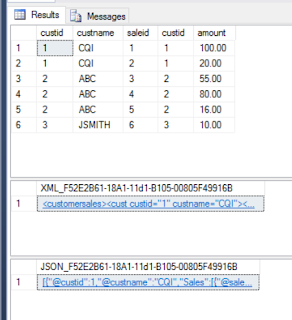 And if we expand the XML result

And here is the JSON result

Hope it can give you some ideas if you have a need to transfer the result set into XML/JSON format. But please keep in mind:
Life is about change, I had never thought one day I would work in a Java/HP Vertica powered cloud BI environment. But it is the fact. How amazing it is...
So I am going to add a few things different to MS techs in the future, some techs related to my current job. So if you see something different to my previous post, don't worry, it is still me :P
Now back to the topic, one of my previous colleagues dropped a question to me today. Basically the core of the question is how to reflect parent/child relationship when exporting query result into XML/JSON. It is quite a common scenario today, so have a quick look at below code:
use tempdb
go

declare @cust table (custid int identity(1,1), custname varchar(50))
declare @sale table (saleid int identity(1, 1), custid int, amount money)

insert into @cust(custname) values ('CQI'), ('ABC'), ('JSMITH')
insert into @sale(custid, amount) values (1, 100), (1, 20), (2, 55), (2, 80), (2, 16), (3, 10)

select * from @cust c join @sale s on c.custid = s.custid


--for xml
--valid since sql2008
--use corelate query to feed child records
--TYPE is a must to ensure return type is xml
select c.custid as '@custid',
 c.custname as '@custname',
 (select saleid as '@saleid', amount as '@amount' from @sale where custid = c.custid for xml path('sales'), TYPE)
from @cust c
for xml path('cust'), root('customersales')

--for json
--2016 only
select c.custid as '@custid',
 c.custname as '@custname',
 (select saleid as '@saleid', amount as '@amount' from @sale where custid = c.custid for json path) as Sales
from @cust c
for json path
So if we run the code listed above:
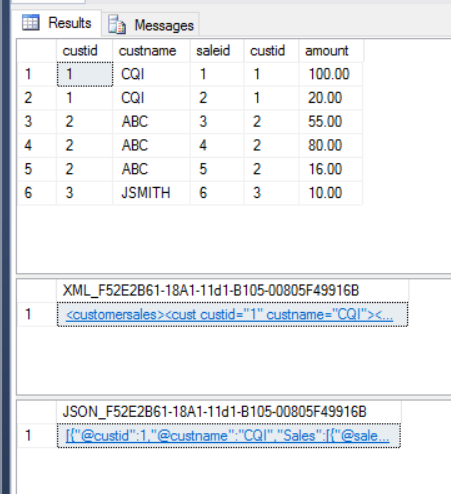
And here is the JSON result

Hope it can give you some ideas if you have a need to transfer the result set into XML/JSON format. But please keep in mind:
- For JSON clause is for SQL Server 2016 only
- In XML output the TYPE keyword in co-related query is required, to ensure output is XML type.
2017-05-06
Create SSIS Package in Code Part 3 - BIML
This is the 3rd, and the last post of the topic "Create SSIS package in Code". The other two posts about this topic can be found via the links below:
So today's topic is creating SSIS package via BIML. BIML, stands for Business Intelligence Markup Language, is an extremely powerful tool can help you prepare and standardize your ETL project. Just in case you haven't heard of it, you can find everything about BIML at BIMLScript site. Just like previous two posts, I am going to demonstrate how easily we can create identical package (a Data Flow Task, flat file connection, and OLE DB connection) in BIML today.
Creating BIML for SSIS package is a bit different to our previous projects, in which we did C# code in a C# console program. To create a BIML file, we do our task in Visual Studio Business Intelligence project.
So first of first, we need to have BIMLExpress installed in our development environment. Then in your Visual Studio IDE you should be able to add BIML file into your project via the menu item:

Alternatively, you can add a BIML file into the project through the context menu.

After we have BIML file added into the project, we can start to write BIML components. To save your time, here is what I wrote:
Once we complete the coding task, we can simply right click the BIML file, and then press "Generate SSIS Package".

Now a new package is generated in our Business Intelligence project (myBIMLPackage). Open the package and run the package, we got the execution result right away.

Obviously, BIML is much simpler than other approaches. It hides the complicated mapping routines for you when you are designing your package. Within the Business Intelligence project, you can add BIML script file as a standard template and then generate packages in one batch. Additionally, BIML express provides quite a lot handy functions to improve your productivity, such as BIML script validation. So I strongly recommend this approach when you are working in ETL project.

Here is the end of the series "Create SSIS package in Code". Before my next post, enjoy it. :)
So today's topic is creating SSIS package via BIML. BIML, stands for Business Intelligence Markup Language, is an extremely powerful tool can help you prepare and standardize your ETL project. Just in case you haven't heard of it, you can find everything about BIML at BIMLScript site. Just like previous two posts, I am going to demonstrate how easily we can create identical package (a Data Flow Task, flat file connection, and OLE DB connection) in BIML today.
Creating BIML for SSIS package is a bit different to our previous projects, in which we did C# code in a C# console program. To create a BIML file, we do our task in Visual Studio Business Intelligence project.
So first of first, we need to have BIMLExpress installed in our development environment. Then in your Visual Studio IDE you should be able to add BIML file into your project via the menu item:

Alternatively, you can add a BIML file into the project through the context menu.

After we have BIML file added into the project, we can start to write BIML components. To save your time, here is what I wrote:
<biml xmlns="http://schemas.varigence.com/biml.xsd">

    <connections>
        <flatfileconnection fileformat="myBIMLFlatFileFormat" filepath="D:\test\test.txt" name="myBIMLFltCon"></flatfileconnection>
        <oledbconnection connectionstring="Data Source=CHI\SS2016;Initial Catalog=Staging;Provider=SQLNCLI11.1;Integrated Security=SSPI" name="myBIMLOleCon"></oledbconnection>
    </connections>

    <fileformats>
        <flatfileformat codepage="1252" columnnamesinfirstdatarow="true" flatfiletype="Delimited" headerrowdelimiter="|" isunicode="false" name="myBIMLFlatFileFormat" textqualifer="None">
            <columns>
                <column columntype="Delimited" datatype="AnsiString" delimiter="|" length="255" name="FirstName"></column>
                <column columntype="Delimited" datatype="AnsiString" delimiter="|" length="255" name="LastName"></column>
                <column columntype="Delimited" datatype="AnsiString" delimiter="|" length="100" name="Suburb"></column>
                <column columntype="Delimited" datatype="AnsiString" delimiter="|" length="3" name="State"></column>
                <column columntype="Delimited" datatype="AnsiString" delimiter="CRLF" length="4" name="Postcode"></column>
            </columns>

        </flatfileformat>
    </fileformats>

    <databases>
        <database connectionname="myBIMLOleCon" name="BIMLStaging"></database>
    </databases>

    <schemas>
        <schema databasename="BIMLStaging" name="BIMLSchema"></schema>
    </schemas>

    <tables>
        <columns>
                <column datatype="AnsiString" length="255" name="FirstName"></column>
                <column datatype="AnsiString" length="255" name="LastName"></column>
                <column datatype="AnsiString" length="100" name="Suburb"></column>
                <column datatype="AnsiString" length="3" name="State"></column>
                <column datatype="AnsiString" length="4" name="Postcode"></column>
            </columns><table name="customer" schemaname="BIMLStaging.BIMLSchema">

        </table>
</tables>


    <packages>
        <package name="myBIMLPackage" protectionlevel="EncryptSensitiveWithUserKey">
            <tasks>
                <dataflow name="myBIMLDFT">
                    <transformations>
                        <flatfilesource connectionname="myBIMLFltCon" name="myBIMLFltSrc"></flatfilesource>
                        <oledbdestination connectionname="myBIMLOleCon" name="myBIMLOLEDest">
                            <inputpath outputpathname="myBIMLFltSrc.Output"></inputpath>
                            <externaltableoutput table="customer"></externaltableoutput>
                        </oledbdestination>
                    </transformations>
                </dataflow>
            </tasks>
        </package>
    </packages>

</biml>
Once we complete the coding task, we can simply right click the BIML file, and then press "Generate SSIS Package".

Now a new package is generated in our Business Intelligence project (myBIMLPackage). Open the package and run the package, we got the execution result right away.
Obviously, BIML is much simpler than other approaches. It hides the complicated mapping routines for you when you are designing your package. Within the Business Intelligence project, you can add BIML script file as a standard template and then generate packages in one batch. Additionally, BIML express provides quite a lot handy functions to improve your productivity, such as BIML script validation. So I strongly recommend this approach when you are working in ETL project.
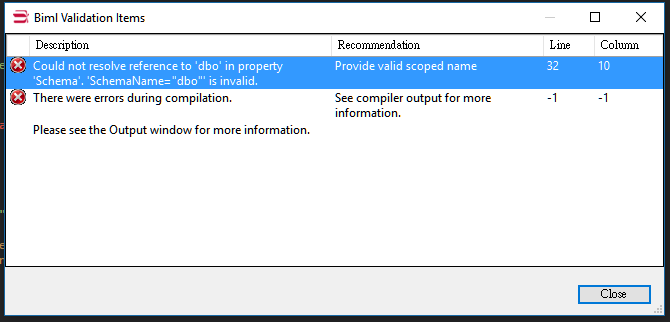
Here is the end of the series "Create SSIS package in Code". Before my next post, enjoy it. :)
Subscribe to:
Posts
(
Atom
)