2017-11-28

API Response Pagination - SSIS

In my previous posts, I demonstrated how to paginate API response in Power Query. But what if we need to do a pagination via SSIS? As far as I know, at this stage there is no generic Rest connector available in SSIS. Therefore, we have to use script component/task to read response from the Rest API.

To show you the approach in a quick way, let's write some codes to replicate the scenario I demonstrated in this post. Firstly I created below function:

private static string callAPI(HttpClient client, string key, string endPoint)
    {
        string jsonBody;

        var header = new MediaTypeWithQualityHeaderValue("application/json");
        client.DefaultRequestHeaders.Accept.Add(header);

        client.DefaultRequestHeaders.Authorization = new AuthenticationHeaderValue("Key", key);

        HttpResponseMessage response = client.GetAsync(endPoint).Result;

        jsonBody = response.Content.ReadAsStringAsync().Result;

        return jsonBody;
    }


Clearly, this function will extract response body from the Rest API (here we assume the API uses HTTP header "Key" for authorization purpose).

So now we have the base method to call the API, what we need to do is creating a recursive routine, so that we can read the next page until nothing returns:

            bool tryNextPage = true;

            using (HttpClient client = new HttpClient())
            {
                while (tryNextPage)
                {
                    string jBody = callAPI(client, key, endPoint);

                    if (jBody.Length > 50)
                    {
                        ResponseBuffer.AddRow();
                        ResponseBuffer.JsonBody.AddBlobData(System.Text.Encoding.UTF8.GetBytes(jBody));

                        int page = int.Parse(endPoint.Substring(endPoint.Length - 1, 1));
                        
                        endPoint = endPoint.Substring(0, endPoint.Length - 1) + (page + incremental).ToString();
                    }
                    else
                    {
                        tryNextPage = false;
                    }
                    
                }

                
            }


As you can see, I defined a Boolean variable to control the While loop. And in each loop, I read length of the Json response to determine if we should read next page.

Simple approach, isn't it? Though it looks like we have to write more lines of code when compare to power query, SSIS does have its own advantages, such as data quality control. Until my next post, enjoy the pagination.

2017-10-01

Power BI/Power Query: API Response Pagination Part 3 - Missing Indicator

This is the 3rd post about pagination in Power BI/Power Query.

In part 1 and part 2 we have discussed how to paginate Restful response if the response contains a total item Count or a next page Token. So what if the response only returns us records, without any indicator about the next page?

Let's take a look on Basecamp todo API. If we call the API at the end point /api/v1/projects/{project id}/todos.json?page=1, the begin of the response and the end of the response look like below screenshots:

begin of the response
end of the response


Sorry for the messy screenshots, but the point is, this API doesn't give us a token for next page. We have to query the next page to ensure our API call pulls all records we need. You might have hundreds of ways to do the job, but my first impression is let's create a recursive function. Let's think about the problem:

1. We receive the first page from the response and merge the records into a table "T";
2. Then we move on to the next page
2.1 If the next page contains records then we repeat step 1 (merge records into "T") and step 2
2.2 If there is no records in the next page, then we stop and return the table "T"

It is simply a classic recursive scenario. In Power Query, the recursive function is all about the "@". Let's look at the codes


let
    ufnQuery = (n) =>
        let
            jsonDoc= Json.Document(
                        Web.Contents(
                            "https://basecamp.com/{domain}/api/v1/projects/{project id}/todos.json?page=" & Number.ToText(n), 
                            [Headers=[Authorization="Basic {the key}"]]
                        )
        ),
        tmpTbl = Table.FromList(jsonDoc, Splitter.SplitByNothing(), null, null, ExtraValues.Error)
    in
        tmpTbl,

    fnRecursive = (tbl, n) =>
        if Table.RowCount(ufnQuery(n)) > 0 then @fnRecursive(Table.Combine({tbl, ufnQuery(n)}), n+1) else tbl,

    tbl = ufnQuery(1),
    result = fnRecursive(tbl, 2)  
in
   result


As you can see, the key function in codes above is the 2nd function, in the function body, we check amount of records returned from the call, and if the amount is greater than 0, we recursively (@) call the function by passing the merged table and next page number. Simple enough, right?


2017-09-17

Power BI/Power Query: API Response Pagination Part 2 - Paginate by Page Cursor

This is the 2nd post of the topic API Response Pagination in Power BI/Power Query. You can find the first post here.

In the first post we have seen an API pagination example in Power Query, in which the API response provides us with the total record count, then we can calculate amount of pages we need to query. So today let's see another typical scenario in API response: the response contains an cursor pointing to the next page. (Here the cursor could be a direct link brings you to the next page, or it could be a page token you need to apply to your next API call).

The example I demonstrated today is Youtube Search API, and the channel I am going to search is VicRoad (as this post is focusing on result pagination, I am not going to explain how to prepare the API call :P). Below is a well-formatted Json response returned from the call. As you can see, the key field (the cursor) we are going to use is "nextPageToken".


Similar to the last post, the first step is preparing a base call function, as shown below. However, this time we return a list, which contains the result set of the current call, as well as the nextPageToken field we can use for drilling calls.


Now here is the core function of today's topic: List.Generate(). Basically you can treat this function as the FOR loop: we initialize a variable, give it a stop condition, specify the incremental action to the variable, and finally populate the return list result. Below is what I wrote:

So what we did is quite clear now: we create a helper function to call the API; Inside the List.Generate() function, we call the function to repeatedly populate records on different pages by using nextPageToken value. So what we need to do is just turning the result to table? Hold on for one second!

Let's review this piece of codes. So initially we call the API without page token, and the return result set contains records from page 1 and token for page 2, hence the second call gives us records from page 2 and token for page 3...


Initial TokenResultsetNext Token
""page 1page 2
page 2page 2page 3
page 3page 3page 4
page 4page 4page 5
.........
last pagelast pagenull

Now you see the problem: our condition for generating the list is "for each NOT NULL nextPageToken". We haven't gone through the last page!

Fixing the problem is quite simple, we can just manually query the last page, and then combine the result sets:

Put all together:

let    
    ufnGetList = (pgToken) =>
        let 
            result = Json.Document(
                        Web.Contents("https://www.googleapis.com/youtube/v3/search?part=snippet&channelId=UCkT7-rjW_Foojt0ZRtbXMdA&maxResults=50&type=video&key=[put your api key here]&pageToken=" & pgToken)
                        ),
            nextPageToken = try result[nextPageToken] otherwise null,
            items = result[items],
            record = [items = items, nextPageToken = nextPageToken]
        in 
            record,

    resultSet = List.Generate(
                    () => ufnGetList(""),
                    each _[nextPageToken] <> null,
                    each ufnGetList(_[nextPageToken]),
                    each [nextPageToken = _[nextPageToken], items = _[items]]
                    ),

    lastPageToken = List.Last(Table.FromRecords(resultSet)[nextPageToken]),
    lastResultSet = ufnGetList(lastPageToken)[items],

    fullResultSet = Table.Combine({Table.FromRecords(List.Combine(Table.FromRecords(resultSet)[items])), Table.FromRecords(lastResultSet)})
    
    
in
    fullResultSet


Now Run the query we should have all the records we need.


2017-09-03

Power BI/Power Query: API Response Pagination Part 1 - Paginate by Item Count

It has been a while since my last post, lots of things happened in these few month, changed my career path, obtained my certification... Finally I got a chance to sit down and restart the blog. So today's topic is pagination in REST API response.

As you can see in the past I had done a few posts of how to consume API results in SSIS via script components, such as this post. But in Power BI, it might not be as easy as what we did in the script component, because there is no direct way to do a loop when reading paginated response.

Generally there are two types of paginated result set:

-- Good: A Json response contains an indicator to provide you with the information of the next page, it could be a link for the next page, or it could be a token for you to issue the next call, or it could be a total item count so you need to do a calculation of how many pages you need to go through. This is today's topic.

-- Cursed: A Json result set does not have pagination information, so you need to query next page every time until the the response gives us nothing.

So, let's prepare today's post here. To demonstrate the logic, I am using the v3 SET (/api/v3/lego/sets) API from rebrickable. The API itself is quite simple, but you need to create an account, then generate a API key from your account profile to call the API.  It is a simple process so I won't cover it here.

After we obtain the API key, it is time to open the Power Query window in Power BI


From opened query window, select Web as the data source


In the pop up window, select Advanced option, and then input API endpoint and key value, as you can see below, I set page size to 100, and the initial page is 1.


Click the OK button and the query should run automatically and give you the result. As you can see the response is quite clear: it provides you total items in the result set, as well as the link you should use to visit the next page. In this example, I am going to use the "count" indicator to do the loop.


Now Power Query has built the basic routine for us. We need to manually modify the query
to return the result page by page. So firstly we open the query edit window by click Advanced Editor


Our query looks like screenshot captured below


In the query editor window, I transform the query into a function, nothing special, it simply accepts a page number and then return the Json response.


Here is the key part:
  • We pull the total item count from the initial call 
  • Then we generate a list for page numbers 
  • For each list item, we call the ufnCallAPI function

And the result returned from the query:

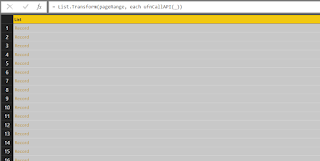
(note: 100/page might be too small to issue the call, if it is too slow, you can try to change the page_size parameter to 1000 in the function definition, as well as the pageRange list boundary to {1..Number.RoundUp(totalItems/1000)} )


As you can see, though there is no loop function available in Power Query (at this stage), we can still retrieve paginated API responses by using provided paging indicator. In my next post, I will cover the topic of how to handle no indicator response in Power Query. Enjoy.


2017-06-01

T-SQL Recipie: Generate XML/JSON Output

Change of Circumstances

Life is about change, I had never thought one day I would work in a Java/HP Vertica powered cloud BI environment. But it is the fact. How amazing it is...

So I am going to add a few things different to MS techs in the future, some techs related to my current job. So if you see something different to my previous post, don't worry, it is still me :P

Now back to the topic, one of my previous colleagues dropped a question to me today. Basically the core of the question is how to reflect parent/child relationship when exporting query result into XML/JSON. It is quite a common scenario today, so have a quick look at below code:

use tempdb
go

declare @cust table (custid int identity(1,1), custname varchar(50))
declare @sale table (saleid int identity(1, 1), custid int, amount money)

insert into @cust(custname) values ('CQI'), ('ABC'), ('JSMITH')
insert into @sale(custid, amount) values (1, 100), (1, 20), (2, 55), (2, 80), (2, 16), (3, 10)

select * from @cust c join @sale s on c.custid = s.custid


--for xml
--valid since sql2008
--use corelate query to feed child records
--TYPE is a must to ensure return type is xml
select c.custid as '@custid',
 c.custname as '@custname',
 (select saleid as '@saleid', amount as '@amount' from @sale where custid = c.custid for xml path('sales'), TYPE)
from @cust c
for xml path('cust'), root('customersales')

--for json
--2016 only
select c.custid as '@custid',
 c.custname as '@custname',
 (select saleid as '@saleid', amount as '@amount' from @sale where custid = c.custid for json path) as Sales
from @cust c
for json path

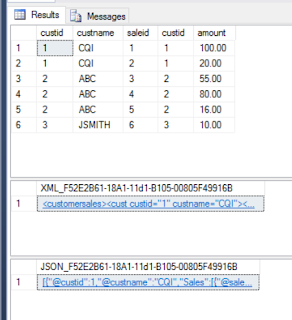
So if we run the code listed above:

And if we expand the XML result


And here is the JSON result


Hope it can give you some ideas if you have a need to transfer the result set into XML/JSON format. But please keep in mind:
  • For JSON clause is for SQL Server 2016 only
  • In XML output the TYPE keyword in co-related query is required, to ensure output is XML type.
So that is it. Enjoy.

2017-05-06

Create SSIS Package in Code Part 3 - BIML

This is the 3rd, and the last post of the topic "Create SSIS package in Code". The other two posts about this topic can be found via the links below:

So today's topic is creating SSIS package via BIML. BIML, stands for Business Intelligence Markup Language,  is an extremely powerful tool can help you prepare and standardize your ETL project. Just in case you haven't heard of it, you can find everything about BIML at BIMLScript site. Just like previous two posts, I am going to demonstrate how easily we can create identical package (a Data Flow Task, flat file connection, and OLE DB connection) in BIML today.

Creating BIML for SSIS package is a bit different to our previous projects, in which we did C# code in a C# console program. To create a BIML file, we do our task in Visual Studio Business Intelligence project.

So first of first, we need to have BIMLExpress installed in our development environment. Then in your Visual Studio IDE you should be able to add BIML file into your project via the menu item:


Alternatively, you can add a BIML file into the project through the context menu.


After we have BIML file added into the project, we can start to write BIML components. To save your time, here is what I wrote:

<biml xmlns="http://schemas.varigence.com/biml.xsd">
    
    <connections>
        <flatfileconnection fileformat="myBIMLFlatFileFormat" filepath="D:\test\test.txt" name="myBIMLFltCon"></flatfileconnection>
        <oledbconnection connectionstring="Data Source=CHI\SS2016;Initial Catalog=Staging;Provider=SQLNCLI11.1;Integrated Security=SSPI" name="myBIMLOleCon"></oledbconnection> 
    </connections>
        
    <fileformats>
        <flatfileformat codepage="1252" columnnamesinfirstdatarow="true" flatfiletype="Delimited" headerrowdelimiter="|" isunicode="false" name="myBIMLFlatFileFormat" textqualifer="None">
            <columns>
                <column columntype="Delimited" datatype="AnsiString" delimiter="|" length="255" name="FirstName"></column>
                <column columntype="Delimited" datatype="AnsiString" delimiter="|" length="255" name="LastName"></column>
                <column columntype="Delimited" datatype="AnsiString" delimiter="|" length="100" name="Suburb"></column>
                <column columntype="Delimited" datatype="AnsiString" delimiter="|" length="3" name="State"></column>
                <column columntype="Delimited" datatype="AnsiString" delimiter="CRLF" length="4" name="Postcode"></column>
            </columns>
            
        </flatfileformat>
    </fileformats>
        
    <databases>
        <database connectionname="myBIMLOleCon" name="BIMLStaging"></database>
    </databases>
    
    <schemas>
        <schema databasename="BIMLStaging" name="BIMLSchema"></schema>
    </schemas>
    
    <tables>
        <columns>
                <column datatype="AnsiString" length="255" name="FirstName"></column>
                <column datatype="AnsiString" length="255" name="LastName"></column>
                <column datatype="AnsiString" length="100" name="Suburb"></column>
                <column datatype="AnsiString" length="3" name="State"></column>
                <column datatype="AnsiString" length="4" name="Postcode"></column>
            </columns><table name="customer" schemaname="BIMLStaging.BIMLSchema">
            
        </table>
</tables>
        
    
    <packages>
        <package name="myBIMLPackage" protectionlevel="EncryptSensitiveWithUserKey">
            <tasks>
                <dataflow name="myBIMLDFT">
                    <transformations>
                        <flatfilesource connectionname="myBIMLFltCon" name="myBIMLFltSrc"></flatfilesource>
                        <oledbdestination connectionname="myBIMLOleCon" name="myBIMLOLEDest">
                            <inputpath outputpathname="myBIMLFltSrc.Output"></inputpath>
                            <externaltableoutput table="customer"></externaltableoutput>
                        </oledbdestination>     
                    </transformations>
                </dataflow>
            </tasks>
        </package>
    </packages>
    
</biml>


Once we complete the coding task, we can simply right click the BIML file, and then press "Generate SSIS Package".


Now a new package is generated in our Business Intelligence project (myBIMLPackage). Open the package and run the package, we got the execution result right away.


Obviously, BIML is much simpler than other approaches. It hides the complicated mapping routines for you when you are designing your package. Within the Business Intelligence project, you can add BIML script file as a standard template and then generate packages in one batch. Additionally, BIML express provides quite a lot handy functions to improve your productivity, such as BIML script validation. So I strongly recommend this approach when you are working in ETL project.


Here is the end of the series "Create SSIS package in Code". Before my next post, enjoy it. :)


2017-04-24

Create SSIS Package in Code Part 2 - EzAPI

This is the 2nd post of the topic "Create SSIS package in Code". The full list of the posts about this topic can be found via the links below:
Today let's look at the option of EzAPI. Basically EzAPI is a set of classes designed to simplify and automate the process of creating SSIS packages. You can find its details and documentations at CodePlex, or just in case at the time you read this post CodePlex has been shut down, you can find it on the nuget.

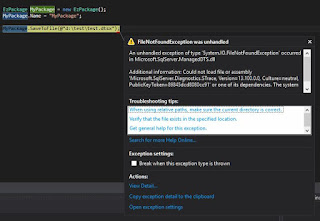
Before I show you the steps of creating a package via EzAPI, you may or may not face this error when you try to save the package:  

An unhandled exception of type 'System.IO.FileNotFoundException' occurred in Microsoft.SqlServer.ManagedDTS.dll

Additional information: Could not load file or assembly 'Microsoft.SqlServer.Diagnostics.STrace, Version=13.100.0.0, Culture=neutral, PublicKeyToken=(your machine based value)' or one of its dependencies. The system cannot find the file specified.


To my understanding it is a reference error, that when the API tries to call its dependency, it cannot find the correct path. To fix the problem, we can manually add the reference. In my case, I move to the system folder "C:\Windows\assembly", search and find correct STrace.dll location (version 13.100.0.0), and then add it into the project reference.


Now if we call the SaveToFile method again, the error has gone.


OK, it is time for the EzAPI. Generally, creating package via EzAPI is much simpler than the pure C# way. Because many SSIS objects have been wrapped and simplified in EzAPI. Below code did the identical thing to my first example: import some records from a flat file into database table, but in a relatively simple way.


        static void Main(string[] args)
        {

            string fltFilePath = @"d:\test\test.txt";
            string pkgPath = @"d:\test\myEzAPIPackage.dtsx";

            EzPackage MyPackage = new EzPackage();
            MyPackage.Name = "myEzAPIPackage";

            //flat file connection manager
            EzFlatFileCM fltFileCM = new EzFlatFileCM(MyPackage);
            fltFileCM.ConnectionString = fltFilePath;
            fltFileCM.ColumnNamesInFirstDataRow = true;

            //similar to the pure C# example
            //we hard code column metadata
            #region columns
            IDTSConnectionManagerFlatFileColumn100 colFirstName = fltFileCM.Columns.Add();
            colFirstName.ColumnType = "Delimited";
            colFirstName.ColumnDelimiter = "|";
            colFirstName.DataType = DataType.DT_STR;
            colFirstName.ColumnWidth = 255;
            ((IDTSName100)colFirstName).Name = "FirstName";


            IDTSConnectionManagerFlatFileColumn100 colLastName = fltFileCM.Columns.Add();
            colLastName.ColumnType = "Delimited";
            colLastName.ColumnDelimiter = "|";
            colLastName.DataType = DataType.DT_STR;
            colLastName.ColumnWidth = 255;
            ((IDTSName100)colLastName).Name = "LastName";

            IDTSConnectionManagerFlatFileColumn100 colSuburb = fltFileCM.Columns.Add();
            colSuburb.ColumnType = "Delimited";
            colSuburb.ColumnDelimiter = "|";
            colSuburb.DataType = DataType.DT_STR;
            colSuburb.ColumnWidth = 100;
            ((IDTSName100)colSuburb).Name = "Suburb";

            IDTSConnectionManagerFlatFileColumn100 colState = fltFileCM.Columns.Add();
            colState.ColumnType = "Delimited";
            colState.ColumnDelimiter = "|";
            colState.DataType = DataType.DT_STR;
            colState.ColumnWidth = 3;
            ((IDTSName100)colState).Name = "State";


            IDTSConnectionManagerFlatFileColumn100 colPostcode = fltFileCM.Columns.Add();
            colPostcode.ColumnType = "Delimited";
            colPostcode.ColumnDelimiter = Environment.NewLine; //this is the last column, so the delimiter needs to be set as new line
            colPostcode.DataType = DataType.DT_STR;
            colPostcode.ColumnWidth = 4;
            ((IDTSName100)colPostcode).Name = "Postcode";

            #endregion

            //ole db connection manager
            EzOleDbConnectionManager oleDBCM = new EzOleDbConnectionManager(MyPackage);
            oleDBCM.ConnectionString = "Data Source = CHI\\SS2016;Provider=SQLNCLI11.1;Initial Catalog = Staging;Integrated Security = SSPI;";
            oleDBCM.Name = "my OLE Connection Manager";

            //data flow task
            EzDataFlow dft = new EzDataFlow(MyPackage);
            dft.Name = "dft EzAPI";

            EzFlatFileSource fltSrc = new EzFlatFileSource(dft);
            fltSrc.Connection = fltFileCM;
            fltSrc.ReinitializeMetaData();

            EzOleDbDestination oleDest = new EzOleDbDestination(dft);
            oleDest.Connection = oleDBCM;
            oleDest.AttachTo(fltSrc);
            oleDest.Table = "Customer";
            

            MyPackage.SaveToFile(pkgPath);

            Console.WriteLine("created successfully");
            Console.ReadLine();

        }


From this code list, we can see EzAPI simplifies the pipeline management, so that we do not need to spend time on adapter coding. However, for the connection managers we still need to define their metadata, and especially when we need to assign flat file source into the data flow task, we need to refresh the metadata by calling ReinitializeMetadata() method.

Now run the program by press F5, the myEzAPIPackage should be generated in your D:\test folder. Open the package in design mode and run it:


So this is the end of this post. In my next post, I will introduce the 3rd way to create the SSIS package dynamically. Before that, enjoy the code. 

2017-03-21

Create SSIS Package in Code Part 1 - Pure C#

A quick question: if you are an ETL specialist, how many times do you need to repeat your SSIS design task? Myself, 80% of my SSIS time is to move a set of data from place A to place B.

So if you haven't known these sort of things, I am going to introduce three ways to build package dynamically:

Today let's focus on pure C# code, it is a bit crazy, so I will never ever suggest anyone to create SSIS packages through this way. But knowing the way how the package is created can give you some understanding when you are looking at EzAPI and BIML. So let's start today's topic.

All I am going to do, is to create a SSIS package in C#, which will load a text file into a table. Below is the T-SQL script to create the dummy table:

use Staging
go

if exists(select 1 from sys.tables where name = 'Customer')
begin
 drop table Customer
end
go

Create table Customer
(
CustomerKey int identity(1,1),
FirstName varchar(255),
LastName varchar(255),
Suburb varchar(100),
State varchar(3),
Postcode varchar(4),
CreatedAt datetime default(getdate())
)
go

insert into Customer (FirstName, LastName, Suburb, State, Postcode)
values
('Chi', 'Qi', 'Richmond', 'VIC', '3121'),
('John', 'Smith', 'Melbourne', 'VIC', '3000')
go

select * from Customer

And the data flow task is as simple as screenshot shows below:


The flat file used in this example is a very simple text file:


To have the package created from C# code directly, I have a C# console project created, then add below references:

Usually you can find these dll files at C:\Program Files (x86)\Microsoft SQL Server\<your SQL Server version>\SDK\Assemblies. Just remember put correct version into the place holder (2016: 130; 2014: 120, 2012: 110, etc.).

Now following the standard way, I add a few using clauses

using Microsoft.SqlServer.Dts.Runtime;
using Microsoft.SqlServer.Dts.Pipeline.Wrapper;
using RunTimeWrapper = Microsoft.SqlServer.Dts.Runtime.Wrapper; 


Now here is a general overview of the steps I am going to do:

  1. create a flat file connection manager for the source; 
  2. create flat file connection in the flat file connection manager;
  3. create column metadata within the flat file connection;
  4. create an OLE DB connection manager for the destination;
  5. create a data flow task in the package;
  6. create the flat file source within the data flow task;
  7. create the OLE DB destination within the data flow task;
  8. create a path between flat file source and OLE DB destination;
  9. map the columns between input and output;
  10. save the package;
  11. execute it!
And after executing the code (package), the staging.dbo.customer table should have dummy customer records from the text file:


I am not going to explain my code line by line - you can find all of them at the end of this post. But there are a few things you might want to know:

  • the connection manager is identified by its name. To have a full list of connection managers, you can all of them at MSDN 
  • the data flow task is identified by its name as well. But when adding them, keep in mind you need to prefix them with "STOCK:". List of the SSIS tasks can be found at here
  • The difficult part is finding correct ComponentClassID for the source and destination. To make it simple, just remember for SSIS 2016 the code is "5", SSIS 2014 the code is "4", SSIS 2012 the code is "3"... 


        static void Main(string[] args)
        {

            Application app = new Application();

            Package pkg = new Package();

            string pkgPath = @"d:\test\myFirstPackage.dtsx";
            string fltFilePath = @"d:\test\text.txt";
                        

            //file connection manager
            ConnectionManager fltFileConMgr = pkg.Connections.Add("FlatFile");
            fltFileConMgr.ConnectionString = @"d:\test\test.txt";
            fltFileConMgr.Name = "my File Connection Manager";

            fltFileConMgr.Properties["Format"].SetValue(fltFileConMgr, "Delimited");
            fltFileConMgr.Properties["ColumnNamesInFirstDataRow"].SetValue(fltFileConMgr, Convert.ToBoolean(true));

            //build the flat file connection in the connection manager
            RunTimeWrapper.IDTSConnectionManagerFlatFile100 fltFileCon = (RunTimeWrapper.IDTSConnectionManagerFlatFile100)fltFileConMgr.InnerObject;
            fltFileCon.CodePage = 1252;

            //for the native flat file connection manager, create import columns
            //in this example, we hard code metadata for all columns
            //FirstName, LastName, Suburb, State, Postcode
            #region columns

            RunTimeWrapper.IDTSConnectionManagerFlatFileColumn100 colFirstName= fltFileCon.Columns.Add();
            colFirstName.ColumnType = "Delimited";
            colFirstName.ColumnDelimiter = "|";
            colFirstName.DataType = RunTimeWrapper.DataType.DT_STR;
            colFirstName.ColumnWidth = 255;
            ((RunTimeWrapper.IDTSName100)colFirstName).Name = "FirstName";

            RunTimeWrapper.IDTSConnectionManagerFlatFileColumn100 colLastName = fltFileCon.Columns.Add();
            colLastName.ColumnType = "Delimited";
            colLastName.ColumnDelimiter = "|";
            colLastName.DataType = RunTimeWrapper.DataType.DT_STR;
            colLastName.ColumnWidth = 255;
            ((RunTimeWrapper.IDTSName100)colLastName).Name = "LastName";

            RunTimeWrapper.IDTSConnectionManagerFlatFileColumn100 colSuburb = fltFileCon.Columns.Add();
            colSuburb.ColumnType = "Delimited";
            colSuburb.ColumnDelimiter = "|";
            colSuburb.DataType = RunTimeWrapper.DataType.DT_STR;
            colSuburb.ColumnWidth = 100;
            ((RunTimeWrapper.IDTSName100)colSuburb).Name = "Suburb";

            RunTimeWrapper.IDTSConnectionManagerFlatFileColumn100 colState = fltFileCon.Columns.Add();
            colState.ColumnType = "Delimited";
            colState.ColumnDelimiter = "|";
            colState.DataType = RunTimeWrapper.DataType.DT_STR;
            colState.ColumnWidth = 3;
            ((RunTimeWrapper.IDTSName100)colState).Name = "State";


            RunTimeWrapper.IDTSConnectionManagerFlatFileColumn100 colPostcode = fltFileCon.Columns.Add();
            colPostcode.ColumnType = "Delimited";
            colPostcode.ColumnDelimiter = Environment.NewLine; //this is the last column, so the delimiter needs to be set as new line
            colPostcode.DataType = RunTimeWrapper.DataType.DT_STR;
            colPostcode.ColumnWidth = 4;
            ((RunTimeWrapper.IDTSName100)colPostcode).Name = "Postcode";

            #endregion


            //ole db connection manager
            ConnectionManager oleConMgr = pkg.Connections.Add("OLEDB");
            oleConMgr.ConnectionString = "Data Source = CHI\\SS2016;Provider=SQLNCLI11.1;Initial Catalog = Staging;Integrated Security = SSPI;";
            oleConMgr.Name = "my OLE Connection Manager";


            //data flow task
            Executable executable = pkg.Executables.Add("STOCK:PipelineTask");
            TaskHost host = (TaskHost)executable;
            host.Name = "DFT my data flow task";

            //now time to add inner object into the DFT
            MainPipe dft = (MainPipe)host.InnerObject;
            

            IDTSComponentMetaData100 src = dft.ComponentMetaDataCollection.New();
            src.Name = "FLT SRC";

            src.ComponentClassID = "DTSAdapter.FlatFileSource.5";
            
            CManagedComponentWrapper instanceSrc = src.Instantiate();
            instanceSrc.ProvideComponentProperties();

            
            if (src.RuntimeConnectionCollection.Count > 0)
            {
                //very important!! get the native object by the conversion
                src.RuntimeConnectionCollection[0].ConnectionManager = DtsConvert.GetExtendedInterface(fltFileConMgr);
                src.RuntimeConnectionCollection[0].ConnectionManagerID = fltFileConMgr.ID;
            }
                                    

            instanceSrc.AcquireConnections(null);
            instanceSrc.ReinitializeMetaData();
            instanceSrc.ReleaseConnections();


            //OLE Destination
            IDTSComponentMetaData100 dest = dft.ComponentMetaDataCollection.New();
            dest.Name = "OLE DEST";
            dest.ComponentClassID = "DTSAdapter.OLEDBDestination.5";

            CManagedComponentWrapper instanceDest = dest.Instantiate();
            instanceDest.ProvideComponentProperties();

            if (dest.RuntimeConnectionCollection.Count > 0)
            {
                dest.RuntimeConnectionCollection[0].ConnectionManager = DtsConvert.GetExtendedInterface(oleConMgr);
                dest.RuntimeConnectionCollection[0].ConnectionManagerID = oleConMgr.ID;
            }

            instanceDest.SetComponentProperty("OpenRowset", "Customer");


            //Path between src and dest
            IDTSPath100 path = dft.PathCollection.New();
            path.AttachPathAndPropagateNotifications(src.OutputCollection[0], dest.InputCollection[0]);

            IDTSInput100 destInput = dest.InputCollection[0];
            IDTSVirtualInput100 destVirtualInput = destInput.GetVirtualInput();
            IDTSVirtualInputColumnCollection100 destVirtualInputColumns = destVirtualInput.VirtualInputColumnCollection;

            instanceDest.AcquireConnections(null);
            instanceDest.ReinitializeMetaData();
            instanceDest.ReleaseConnections();


            //finally, map columns between input and output by name
            foreach (IDTSVirtualInputColumn100 virtualCol in destVirtualInputColumns)
            {
                IDTSInputColumn100 inputCol = instanceDest.SetUsageType(destInput.ID, destVirtualInput, virtualCol.LineageID, DTSUsageType.UT_READONLY);
                IDTSExternalMetadataColumn100 externalColumn = destInput.ExternalMetadataColumnCollection[inputCol.Name];
                instanceDest.MapInputColumn(destInput.ID, inputCol.ID, externalColumn.ID);
            }


            app.SaveToXml(pkgPath, pkg, null);

            pkg.Execute();

            Console.WriteLine("package created");
            Console.ReadLine();
        }

2017-02-19

TSQL Recipes: Send Dynamic Query Result through Email

How many emails do you need to trigger from the server every day? How many of them are just single row query result? Well, I have to send a lot html formatted, single row query result to clients. Not funny at all. So if you are doing the same thing, today's recipe could save you a bit.

You don't need to read this post line by line, to save your time, below is the definition. If you are an expert in dynamic query, you should know what I am doing fairly quick. In case my sp is too complicated, I put my notes after the procedure.

 
Create Procedure [dbo].[sp_SendVerticalHTMLEmail]
@Query nvarchar(max),
@CSSStyle nvarchar(max),
@EmailTo nvarchar(500),
@EmailCc nvarchar(500),
@EmailSubjct nvarchar(255),
@EmailAttachments nvarchar(max)
as
BEGIN
 SET NOCOUNT ON

 declare @id int = 0

 BEGIN TRY  
  declare @EmailBody nvarchar(max) = '', @cmd nvarchar(max) = '' 

  IF @CSSStyle = '' OR @CSSStyle is null
  SET @CSSStyle = 'table {border-collapse: collapse; font-size:90%}table, td, th {border: 1px solid black;}td.header {font-weight: bold}'
  
  select @cmd += 'IF object_id (''tempdb.dbo.#Tmp'') IS NOT NULL DROP Table tempdb.dbo.#Tmp;'+ CHAR(10) + char(13)

  select @cmd += 'select * INTO #Tmp FROM ( ' + @query + ') tmp;' + CHAR(10) + char(13)

  select @cmd +='declare @tmpSql nvarchar(max) = ''''
  select @tmpSql += 
  ''SELECT '''''' + name + '''''' as R1, (select CAST('' + QUOTENAME(CAST(name as varchar(255)), ''[]'') + '' as varchar(1000)) from #tmp) as R2   UNION ALL '' + CHAR(10) + char(13)
  from tempdb.sys.columns where object_id = object_id(''tempdb.dbo.#Tmp'');

  select @tmpSql = left(@tmpSql, len(@tmpSql) - 12);

  declare @var nvarchar(max) = ''''
  select @var =''SELECT @body = ('' + CAST(''SELECT td = R1, '''''''', td = R2 from ('' + @tmpSql + '') t FOR XML PATH(''''tr'''')'' as nvarchar(max)) + '')''

  exec sp_executesql @var, N''@body nvarchar(max) OUTPUT'', @body output' 

  --select @cmd

  exec sp_executesql @cmd, N'@body nvarchar(max) output', @EmailBody output

  select  @EmailBody = '' + @EmailBody + '
' exec msdb..sp_send_dbmail @recipients = @EmailTo, @copy_recipients = @EmailCc, @subject = @EmailSubjct, @body = @EmailBody, @body_format = 'HTML', @file_attachments = @EmailAttachments, @mailitem_id = @id output END TRY BEGIN CATCH select @id = -1 END CATCH RETURN @id END


So here is my notes, The basic concept is like this:

1. I want to have a sp which can accept a query statement, wrap my query result, and send through in the email body right away. I am targeting single row query result because to me, most multi row result sets need to be handled separately. But single row result is just like a short and quick notification.

2. Now I know I am looking at single row result set. But I have no idea how many columns a query can return. So the eaist way is turning the result set 90 degrees to become a vertical two column result set, the first column is the original column header, and the second column is the row contents.

3. To read the column titles from the result set, I load the query result into a temp table by calling a dynamic query:

 
select @cmd += 'select * INTO #Tmp FROM ( ' + @query + ') tmp;' + CHAR(10) + char(13)


4. Now think in this way, from the temp table, I can get a two-row result set: the first row is the column titles of the temp table, and the second row is the original data row. It is just a simple information schema query, and an union statement. So for the temp table, we can simple write down

 
select * from sys.columns where object_id = object_id('tempdb.dbo.#Tmp')
union all
select * from tempdb.dbo.#Tmp


5. Once we have the two row result set, we can then use a for XML clause to generate html email. Something just like:

 
SELECT @body = (SELECT td = R1, '', td = R2 from (select * from myTable) t FOR XML PATH('tr'))


6. Everything looks pretty simple, isnt it? Hold on for one second. Well, the difficult part of the procedure is that, we have to get the dynamic result set within a dynamic execution context. Get confused? Think about it, starts from step 4, we transform the resultset by referring #Tmp. But this temp table was generated by a dynamic statement in step 3. So to make temp table context available to the following execution steps, we have to wrap the procedure "sp_executesql" within the dynamic statement. This is the reason you can see two "sp_executesql" calls within my procedure.

7. the last point, you might have noticed, I named my procedure "sp_xxx", not a good practice as this pattern leads to bad practice. But in my case, I want to have this sp available to all my databases, so I registered this procedure as a system procedure by calling

 
sp_ms_marksystemobject 'sp_SendVerticalHTMLEmail'


So now we can have a test


and the 2nd test


Enjoy it :)

2017-01-26

Sending Email by Gmail Service

In my previous post, we had tried to send email through O365. Today in my first post in 2017, let's try to send an email through gmail service.

Firstly let's look at configuration part. First of the first, we need a google account :p, then we need to turn on the less secure apps setting for the google account. To do that, we can go to the setting page, and then select "turn on".


Pretty much it is the only configuration we need to do at google account level.Very simple, isn't it? Now let's see the coding part. Open a new console program project in Visual Studio, add system.net and system.net.mail into the using section, and then add codes below. Run the program, you should have the email in your mail box.

            //add your email account & password here
            string username = "your account name";
            string password = "your password";

            string emailbody = "some text";

            var client = new SmtpClient("smtp.gmail.com", 587)
            {
                Credentials = new NetworkCredential(username, password),
                EnableSsl = true
            };

            try
            {              
                MailMessage msg = new MailMessage();
                msg.From = new MailAddress(username);

                //add a to recipient here
                msg.To.Add("recipient@emaildomain.com.au");

                msg.Subject = "test html from google account";
                msg.Body = emailbody;
                msg.IsBodyHtml = true;

                Console.WriteLine(DateTime.Now.ToLongTimeString());
                client.Send(msg);
                Console.WriteLine("Sent");
                Console.WriteLine(DateTime.Now.ToLongTimeString());
            }
            catch (Exception ex)
            {
                Console.WriteLine(ex.Message);
            }
            
            Console.ReadLine();


Now, we can make the thing even easier if we want to send emails from SQL Server. What we need to do is just add the gmail into database's mail profile.

Find the Database Mail node in SQL Server Management Studio and select "configure database mail" option


Leave the option to the "Set up Database Mail by performing the following tasks" and press next button


on the next screen, input a profile name, then click add button to add a SMTP account


We need to select an account for the new profile. Since we have not created one for our gmail account, click the "New Account" button


Now we are on the window of "New Database Mail Account", give this account a name by filling in account name. Then add your gmail account information into the fields required, as demonstrated below:


Once all fields are completed, click the OK button will close current account setting window and bring you back to the profile setting window.


The next window will ask you to select a default profile. I don't want any change to the system default profile, so just level it as is and press next button.


Now the next screen asks us to adjust parameters for the profile, leave every to default and press next button


The final screen just shows us a summary of what SQL Server will do for us. Press finish button and SQL Server will set everything up for you.


We can then do a simple test. Right click the Database Mail node and select "Send Test E-mail"


From the dropdown box, select our newly created gmail profile, provide a to recipient, then press "Send Test E-mail".


Now check your mail box, you've got mail :D