- by native C# code
- by EzAPI (this post)
- by BIML
Before I show you the steps of creating a package via EzAPI, you may or may not face this error when you try to save the package:
An unhandled exception of type 'System.IO.FileNotFoundException' occurred in Microsoft.SqlServer.ManagedDTS.dll
Additional information: Could not load file or assembly 'Microsoft.SqlServer.Diagnostics.STrace, Version=13.100.0.0, Culture=neutral, PublicKeyToken=(your machine based value)' or one of its dependencies. The system cannot find the file specified.
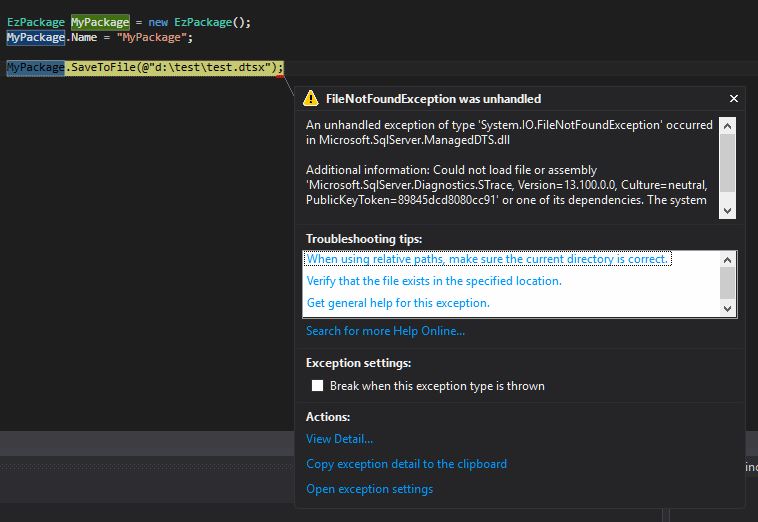
To my understanding it is a reference error, that when the API tries to call its dependency, it cannot find the correct path. To fix the problem, we can manually add the reference. In my case, I move to the system folder "C:\Windows\assembly", search and find correct STrace.dll location (version 13.100.0.0), and then add it into the project reference.

Now if we call the SaveToFile method again, the error has gone.

OK, it is time for the EzAPI. Generally, creating package via EzAPI is much simpler than the pure C# way. Because many SSIS objects have been wrapped and simplified in EzAPI. Below code did the identical thing to my first example: import some records from a flat file into database table, but in a relatively simple way.
        static void Main(string[] args)
        {

            string fltFilePath = @"d:\test\test.txt";
            string pkgPath = @"d:\test\myEzAPIPackage.dtsx";

            EzPackage MyPackage = new EzPackage();
            MyPackage.Name = "myEzAPIPackage";

            //flat file connection manager
            EzFlatFileCM fltFileCM = new EzFlatFileCM(MyPackage);
            fltFileCM.ConnectionString = fltFilePath;
            fltFileCM.ColumnNamesInFirstDataRow = true;

            //similar to the pure C# example
            //we hard code column metadata
            #region columns
            IDTSConnectionManagerFlatFileColumn100 colFirstName = fltFileCM.Columns.Add();
            colFirstName.ColumnType = "Delimited";
            colFirstName.ColumnDelimiter = "|";
            colFirstName.DataType = DataType.DT_STR;
            colFirstName.ColumnWidth = 255;
            ((IDTSName100)colFirstName).Name = "FirstName";


            IDTSConnectionManagerFlatFileColumn100 colLastName = fltFileCM.Columns.Add();
            colLastName.ColumnType = "Delimited";
            colLastName.ColumnDelimiter = "|";
            colLastName.DataType = DataType.DT_STR;
            colLastName.ColumnWidth = 255;
            ((IDTSName100)colLastName).Name = "LastName";

            IDTSConnectionManagerFlatFileColumn100 colSuburb = fltFileCM.Columns.Add();
            colSuburb.ColumnType = "Delimited";
            colSuburb.ColumnDelimiter = "|";
            colSuburb.DataType = DataType.DT_STR;
            colSuburb.ColumnWidth = 100;
            ((IDTSName100)colSuburb).Name = "Suburb";

            IDTSConnectionManagerFlatFileColumn100 colState = fltFileCM.Columns.Add();
            colState.ColumnType = "Delimited";
            colState.ColumnDelimiter = "|";
            colState.DataType = DataType.DT_STR;
            colState.ColumnWidth = 3;
            ((IDTSName100)colState).Name = "State";


            IDTSConnectionManagerFlatFileColumn100 colPostcode = fltFileCM.Columns.Add();
            colPostcode.ColumnType = "Delimited";
            colPostcode.ColumnDelimiter = Environment.NewLine; //this is the last column, so the delimiter needs to be set as new line
            colPostcode.DataType = DataType.DT_STR;
            colPostcode.ColumnWidth = 4;
            ((IDTSName100)colPostcode).Name = "Postcode";

            #endregion

            //ole db connection manager
            EzOleDbConnectionManager oleDBCM = new EzOleDbConnectionManager(MyPackage);
            oleDBCM.ConnectionString = "Data Source = CHI\\SS2016;Provider=SQLNCLI11.1;Initial Catalog = Staging;Integrated Security = SSPI;";
            oleDBCM.Name = "my OLE Connection Manager";

            //data flow task
            EzDataFlow dft = new EzDataFlow(MyPackage);
            dft.Name = "dft EzAPI";

            EzFlatFileSource fltSrc = new EzFlatFileSource(dft);
            fltSrc.Connection = fltFileCM;
            fltSrc.ReinitializeMetaData();

            EzOleDbDestination oleDest = new EzOleDbDestination(dft);
            oleDest.Connection = oleDBCM;
            oleDest.AttachTo(fltSrc);
            oleDest.Table = "Customer";


            MyPackage.SaveToFile(pkgPath);

            Console.WriteLine("created successfully");
            Console.ReadLine();

        }
From this code list, we can see EzAPI simplifies the pipeline management, so that we do not need to spend time on adapter coding. However, for the connection managers we still need to define their metadata, and especially when we need to assign flat file source into the data flow task, we need to refresh the metadata by calling ReinitializeMetadata() method.
Now run the program by press F5, the myEzAPIPackage should be generated in your D:\test folder. Open the package in design mode and run it:


So this is the end of this post. In my next post, I will introduce the 3rd way to create the SSIS package dynamically. Before that, enjoy the code.